前言
这一部分是环境仿真相关的内容,其中有些操作是前边多次操作过的,如果你在学习的时候不清楚请及时回顾。
一、RVIZ中控制机器人的运动
1.arbotix简介
arbotix是一款控制电机、舵机的控制板,并提供相应的ros包,这个功能包的功能不仅可以驱动真实的arbotix控制板,它还提供一个差速控制器,通过接收速度控制指令更新机器人的joint状态,从而帮助我们实现机器人在rviz中的运动。
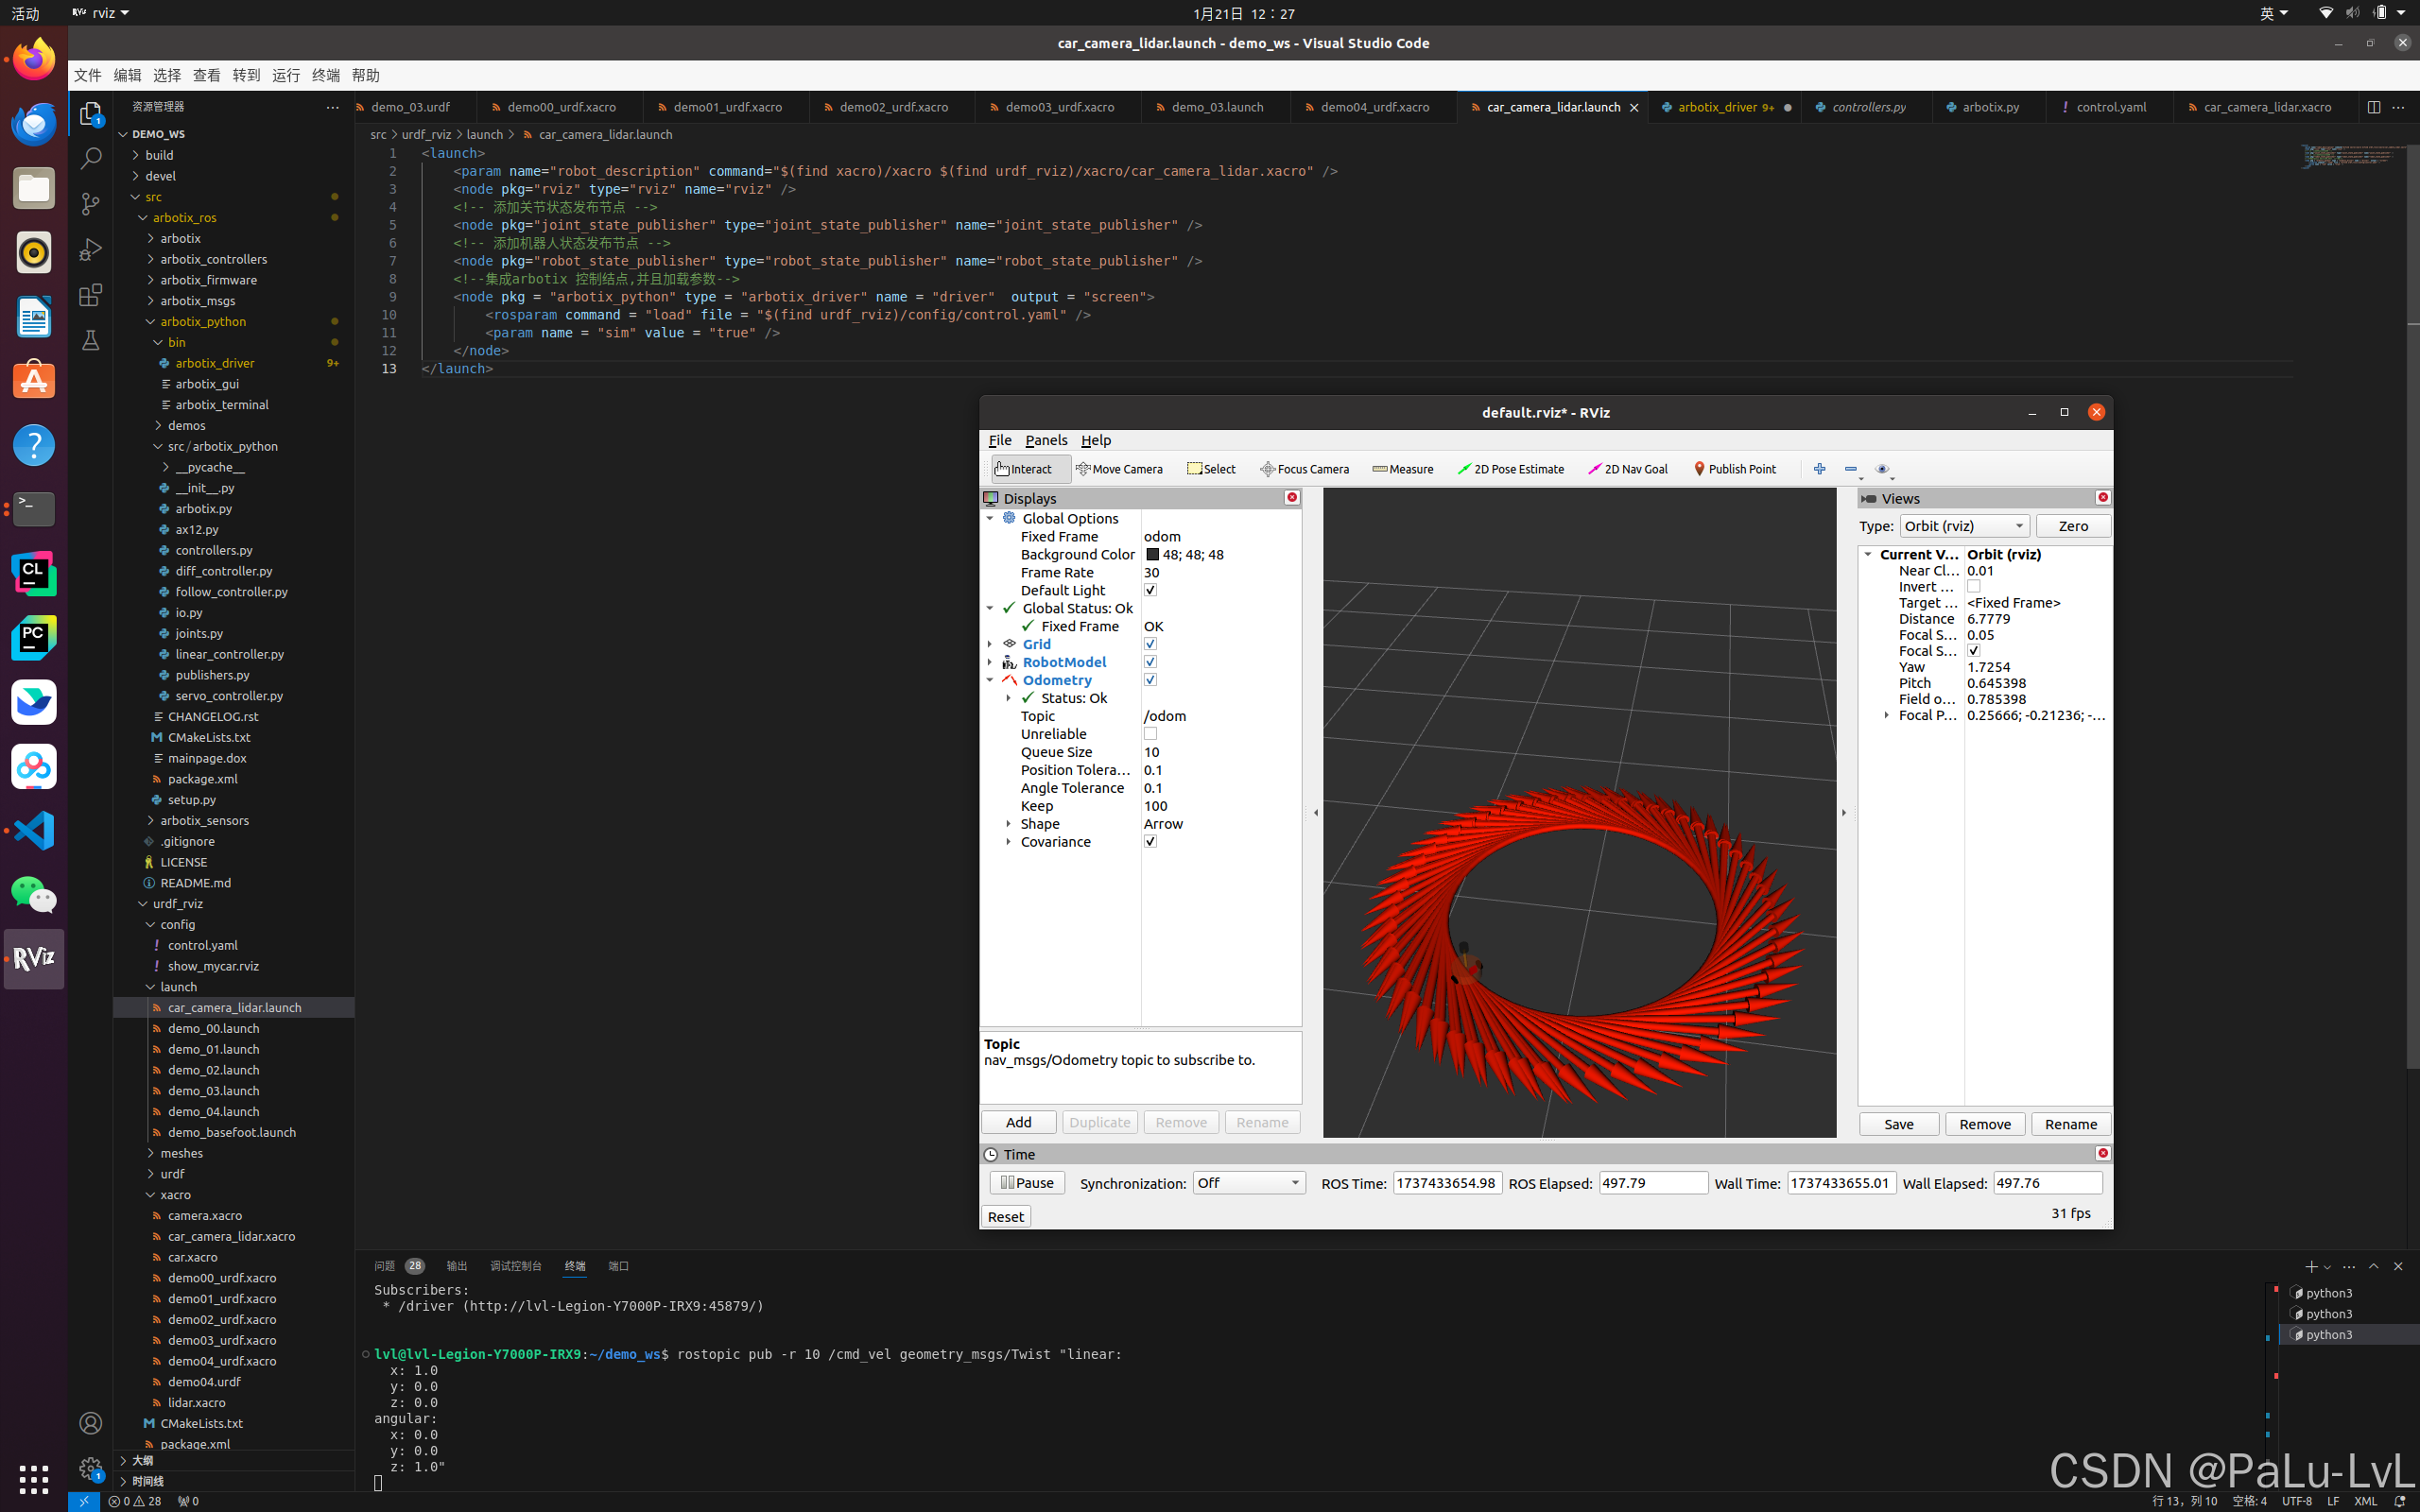
2.控制机器人模型在rviz中做圆周运动
实现流程:
1.安装 Arbotix
2.创建新功能包,准备机器人 urdf、xacro 文件
3.添加 Arbotix 配置文件
4.编写 launch 文件配置 Arbotix
5.启动 launch 文件并控制机器人模型运动
这里我新创建了一个工作空间demo01_ws。
1.安装Arbotix
在工作空间下克隆代码
git clone -b indigo-devel https://github.com/vanadiumlabs/arbotix_ros.git
获取失败也可以采用下面的方式:
noetic是我的版本请根据你自己的版本更换命令。
sudo apt install ros-noetic-arbotix
编译一下
catkin_make
2.创建新功能包,准备机器人 urdf、xacro 文件
这里新创建了一个car功能包。
利用上节已经编写好的小车模型即可
3.添加 Arbotix 配置文件
添加arbotix所需的配置文件 control.yaml放到config文件夹下面。
# 该文件是控制器配置,一个机器人模型可能有多个控制器,比如: 底盘、机械臂、夹持器(机械手).... # 因此,根 name 是 controller controllers: { # 单控制器设置 base_controller: { #类型: 差速控制器 type: diff_controller, #参考坐标 base_frame_id: base_footprint, #两个轮子之间的间距 base_width: 0.2, #控制频率 ticks_meter: 2000, #PID控制参数,使机器人车轮快速达到预期速度 Kp: 12, Kd: 12, Ki: 0, Ko: 50, #加速限制 accel_limit: 1.0 } }
4.编写 launch 文件配置 Arbotix
<launch> <param name="robot_description" command="$(find xacro)/xacro $(find car)/xacro/car.urdf.xacro" /> <node pkg="rviz" type="rviz" name="rviz" /> <!-- 添加关节状态发布节点 --> <node pkg="joint_state_publisher" type="joint_state_publisher" name="joint_state_publisher" /> <!-- 添加机器人状态发布节点 --> <node pkg="robot_state_publisher" type="robot_state_publisher" name="robot_state_publisher" /> <!--集成arbotix 控制结点,并且加载参数--> <node pkg = "arbotix_python" type = "arbotix_driver" name = "driver" output = "screen" > <rosparam command = "load" file = "$(find car)/config/control.yaml" /> <param name = "sim" value = "true"/> </launch>
5.启动 launch 文件并控制机器人模型运动
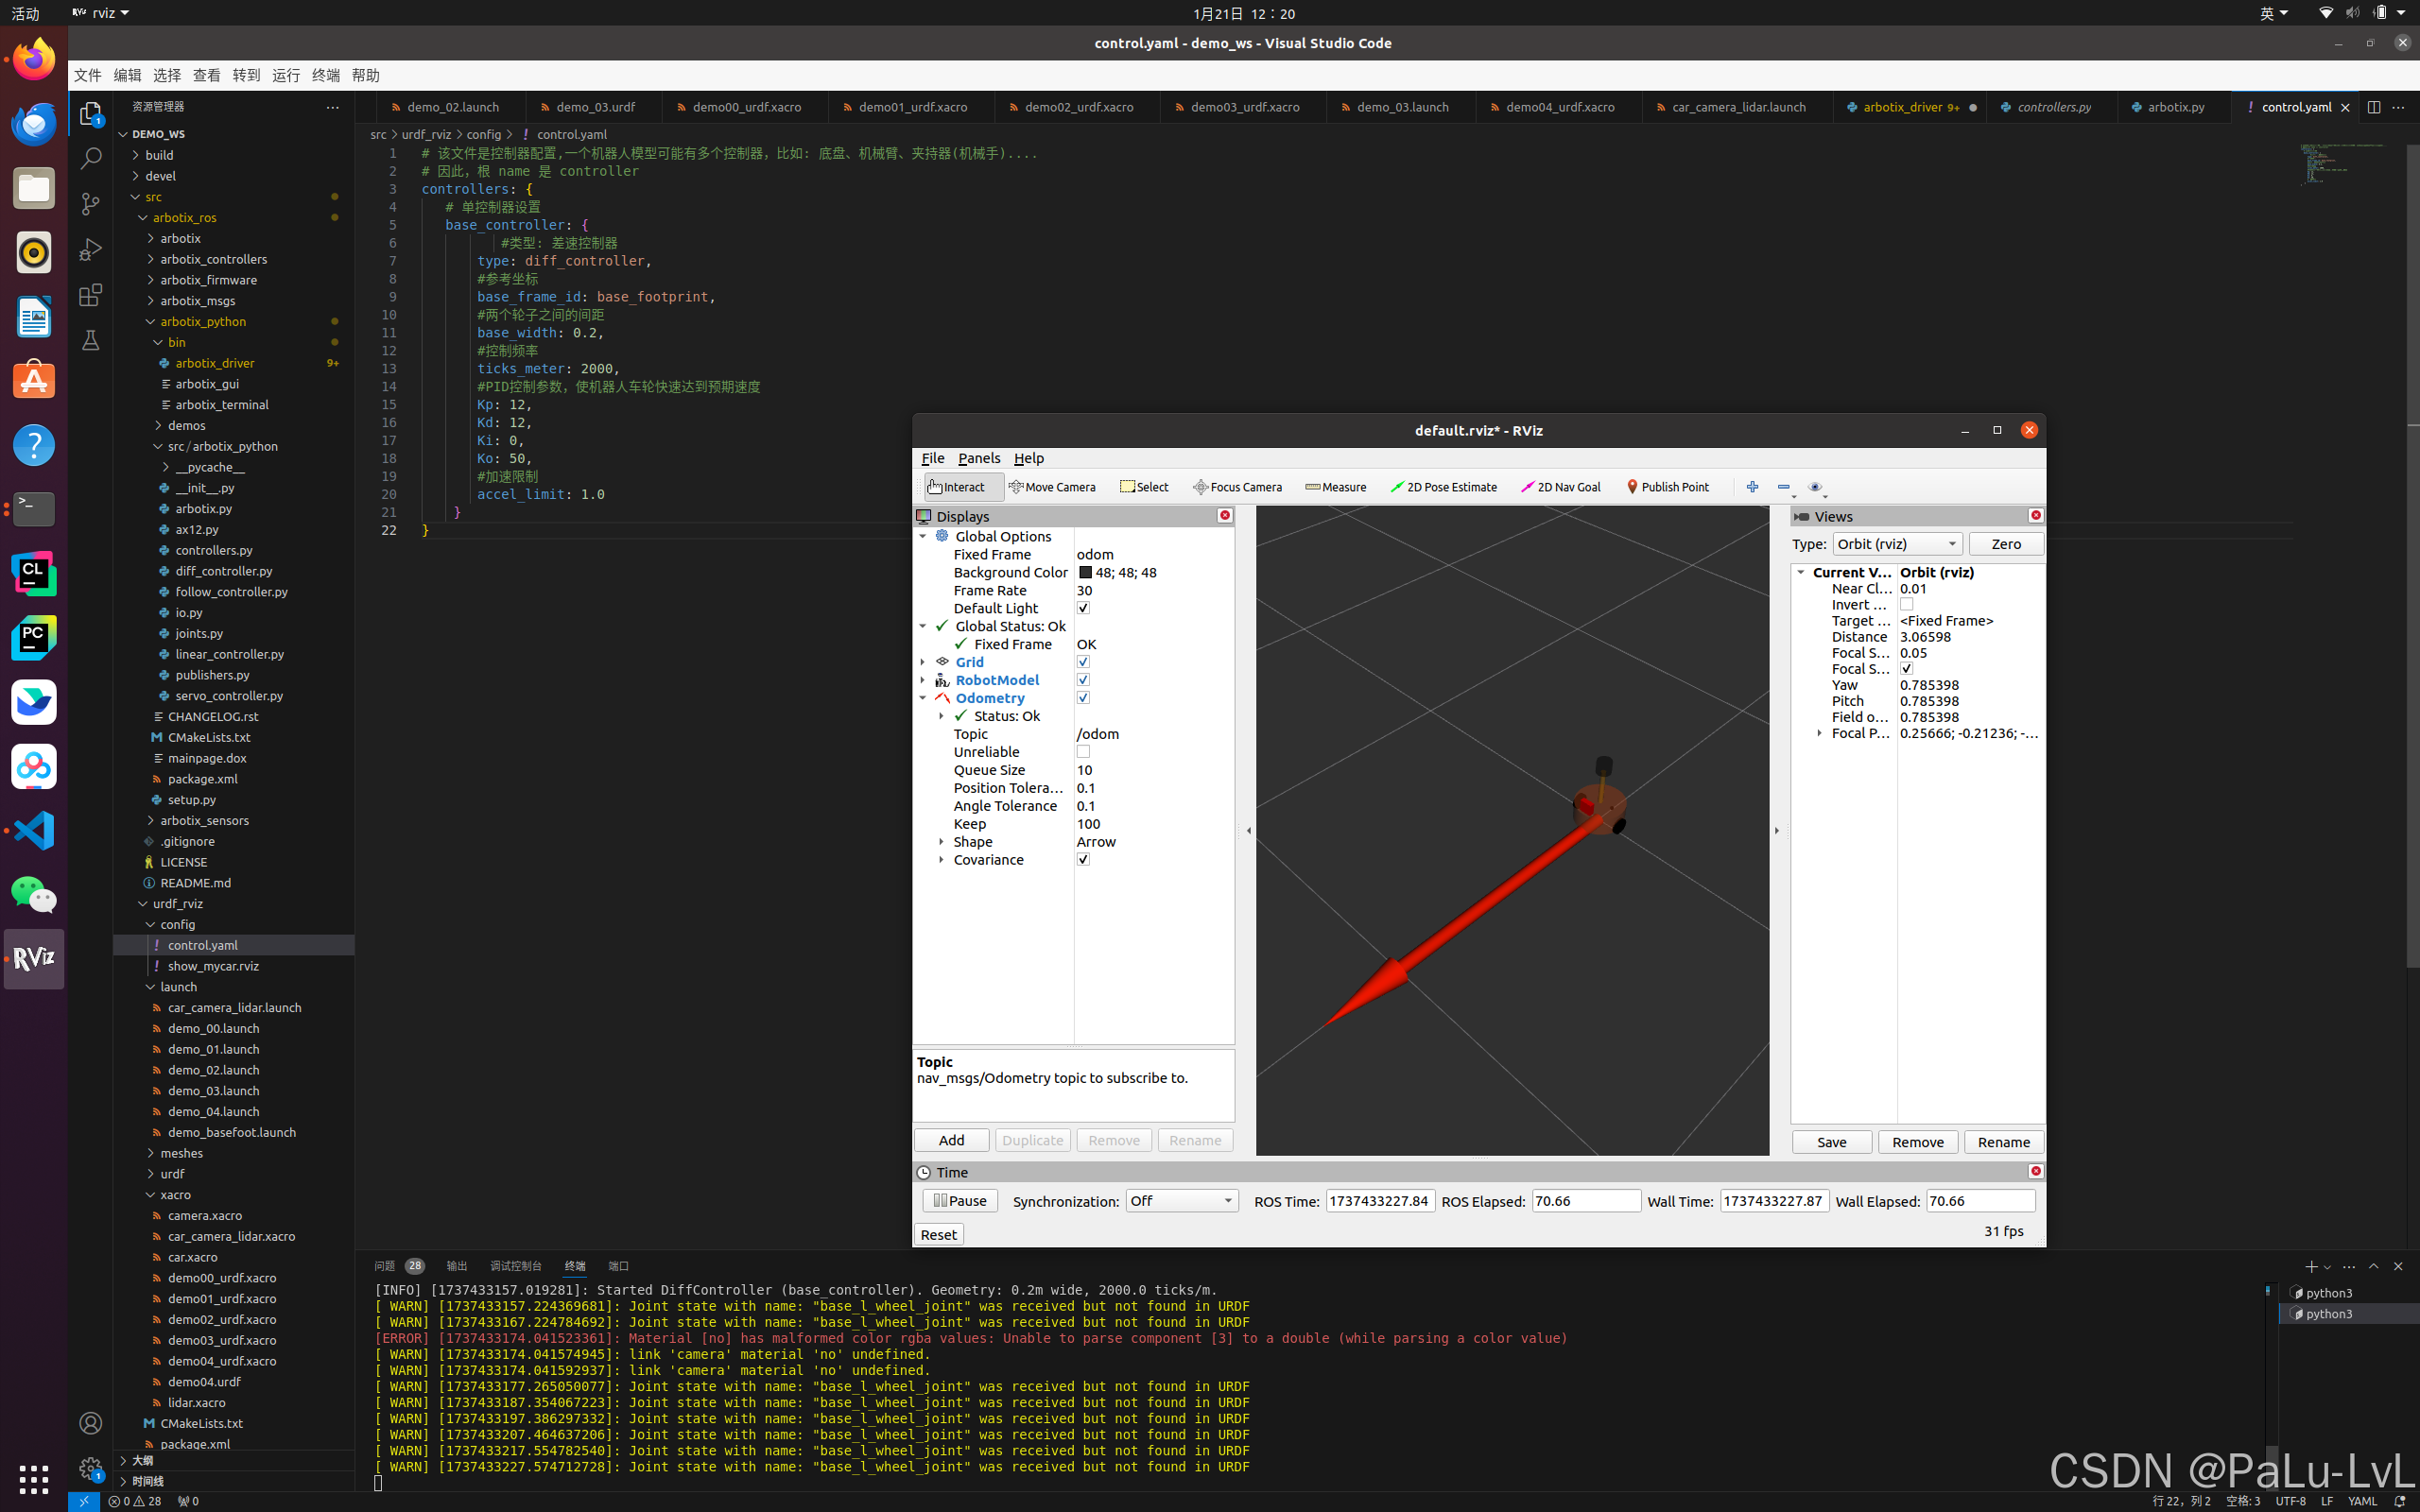
lvl@lvl-Legion-Y7000P-IRX9:~/demo_ws$ rostopic pub -r 10 /cmd_vel geometry_msgs/Twist "linear: x: 1.0 y: 0.0 z: 0.0 angular: x: 0.0 y: 0.0 z: 1.0"
输入命令后的运行结果:
二、URDF集成Gazebo
1.主要内容
URDF 需要集成进 Rviz 或 Gazebo 才能显示可视化的机器人模型,前面已经介绍了URDF 与 Rviz 的集成,本节主要介绍:
1.URDF 与 Gazebo 的基本集成流程;
2.如果要在 Gazebo 中显示机器人模型,URDF 需要做的一些额外配置;
3.关于Gazebo仿真环境的搭建;
2.URDF与Gazebo基本集成流程
1.URDF与Gazebo基本集成流程
1.主要步骤
1.创建功能包,导入依赖项
2.编写 URDF 或 Xacro 文件
3.启动 Gazebo 并显示机器人模型
2.具体实现流程
1.创建功能包 urdf_rviz01 ,导入依赖 urdf xacro gazebo_ros gazebo_ros_control gazebo_plugins。
2.gazebo集成需要urdf设置碰撞参数与惯性矩阵参数
碰撞参数的设置:如果是标准几何体,直接复制visual可视化标签下的geometry和origin即可
惯性矩阵
gazebo有自己的颜色设置
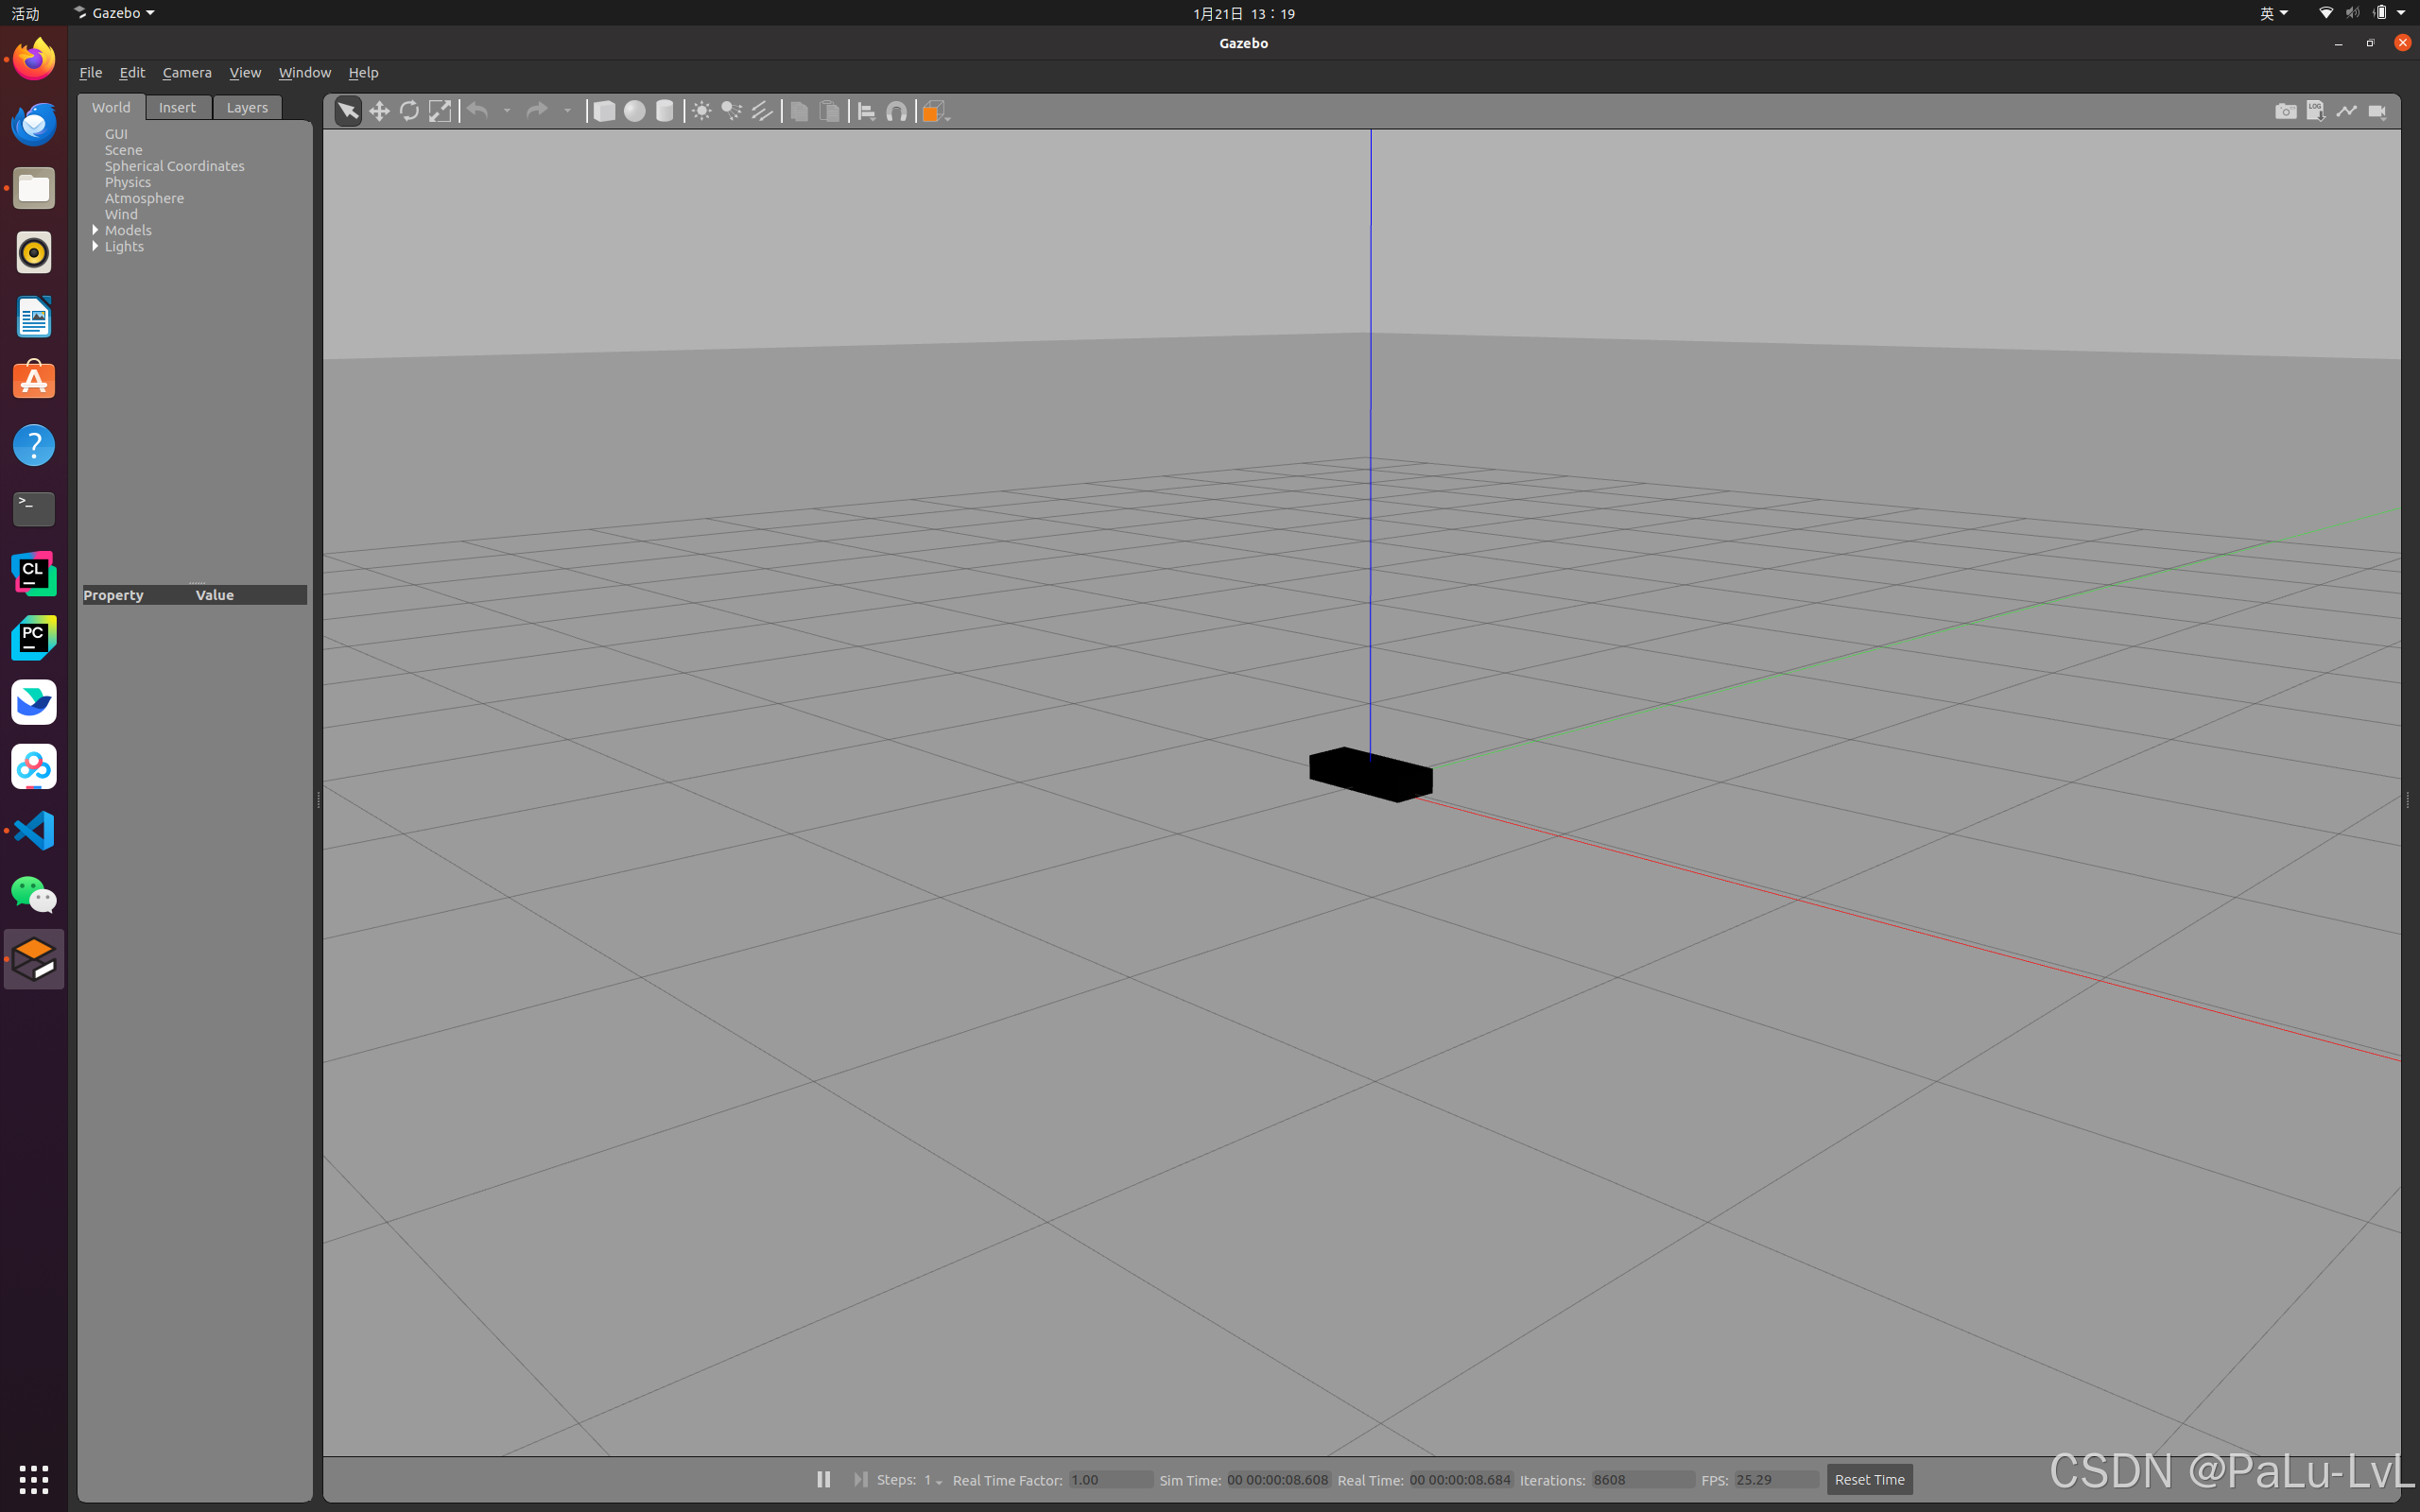
<robot name="mycar"> <link name="base_link"> <visual> <geometry> <box size="0.5 0.2 0.1" /> </geometry> <origin xyz="0.0 0.0 0.0" rpy="0.0 0.0 0.0" /> <material name="yellow"> <color rgba="0.5 0.3 0.0 1" /> </material> </visual> <collision> <geometry> <box size="0.5 0.2 0.1" /> </geometry> <origin xyz="0.0 0.0 0.0" rpy="0.0 0.0 0.0" /> </collision> <inertial> <origin xyz="0 0 0" /> <mass value="6" /> <inertia ixx="1" ixy="0" ixz="0" iyy="1" iyz="0" izz="1" /> </inertial> </link> <gazebo reference="base_link"> <material>Gazebo/Black</material> </gazebo> </robot>
3.将urdf集成到launch文件中,并启动gazebo
demo.launch:
<launch> <!-- 将 Urdf 文件的内容加载到参数服务器 --> <param name="robot_description" textfile="$(find urdf_rviz01)/urdf/demo.urdf" /> <!-- 启动 gazebo --> <include file="$(find gazebo_ros)/launch/empty_world.launch" /> <!-- 在 gazebo 中显示机器人模型 --> <node pkg="gazebo_ros" type="spawn_model" name="model" args="-urdf -model mycar -param robot_description" /> </launch>
运行:
3.URDF集成Gazebo相关设置
1.collision
如果机器人link是标准的几何体形状,和link的 visual 属性设置一致即可。
2.inertial
惯性矩阵的设置需要结合link的质量与外形参数动态生成,标准的球体、圆柱与立方体的惯性矩阵公式如下(已经封装为 xacro 实现):
1.球体惯性矩阵
<!-- Macro for inertia matrix --> <xacro:macro name="sphere_inertial_matrix" params="m r"> <inertial> <mass value="${m}" /> <inertia ixx="${2*m*r*r/5}" ixy="0" ixz="0" iyy="${2*m*r*r/5}" iyz="0" izz="${2*m*r*r/5}" /> </inertial> </xacro:macro>
2..圆柱惯性矩阵
<xacro:macro name="cylinder_inertial_matrix" params="m r h"> <inertial> <mass value="${m}" /> <inertia ixx="${m*(3*r*r+h*h)/12}" ixy = "0" ixz = "0" iyy="${m*(3*r*r+h*h)/12}" iyz = "0" izz="${m*r*r/2}" /> </inertial> </xacro:macro>
3.立方体惯性矩阵
<xacro:macro name="Box_inertial_matrix" params="m l w h"> <inertial> <mass value="${m}" /> <inertia ixx="${m*(h*h + l*l)/12}" ixy = "0" ixz = "0" iyy="${m*(w*w + l*l)/12}" iyz= "0" izz="${m*(w*w + h*h)/12}" /> </inertial> </xacro:macro>
4.URDF集成Gazebo实操
1.需求
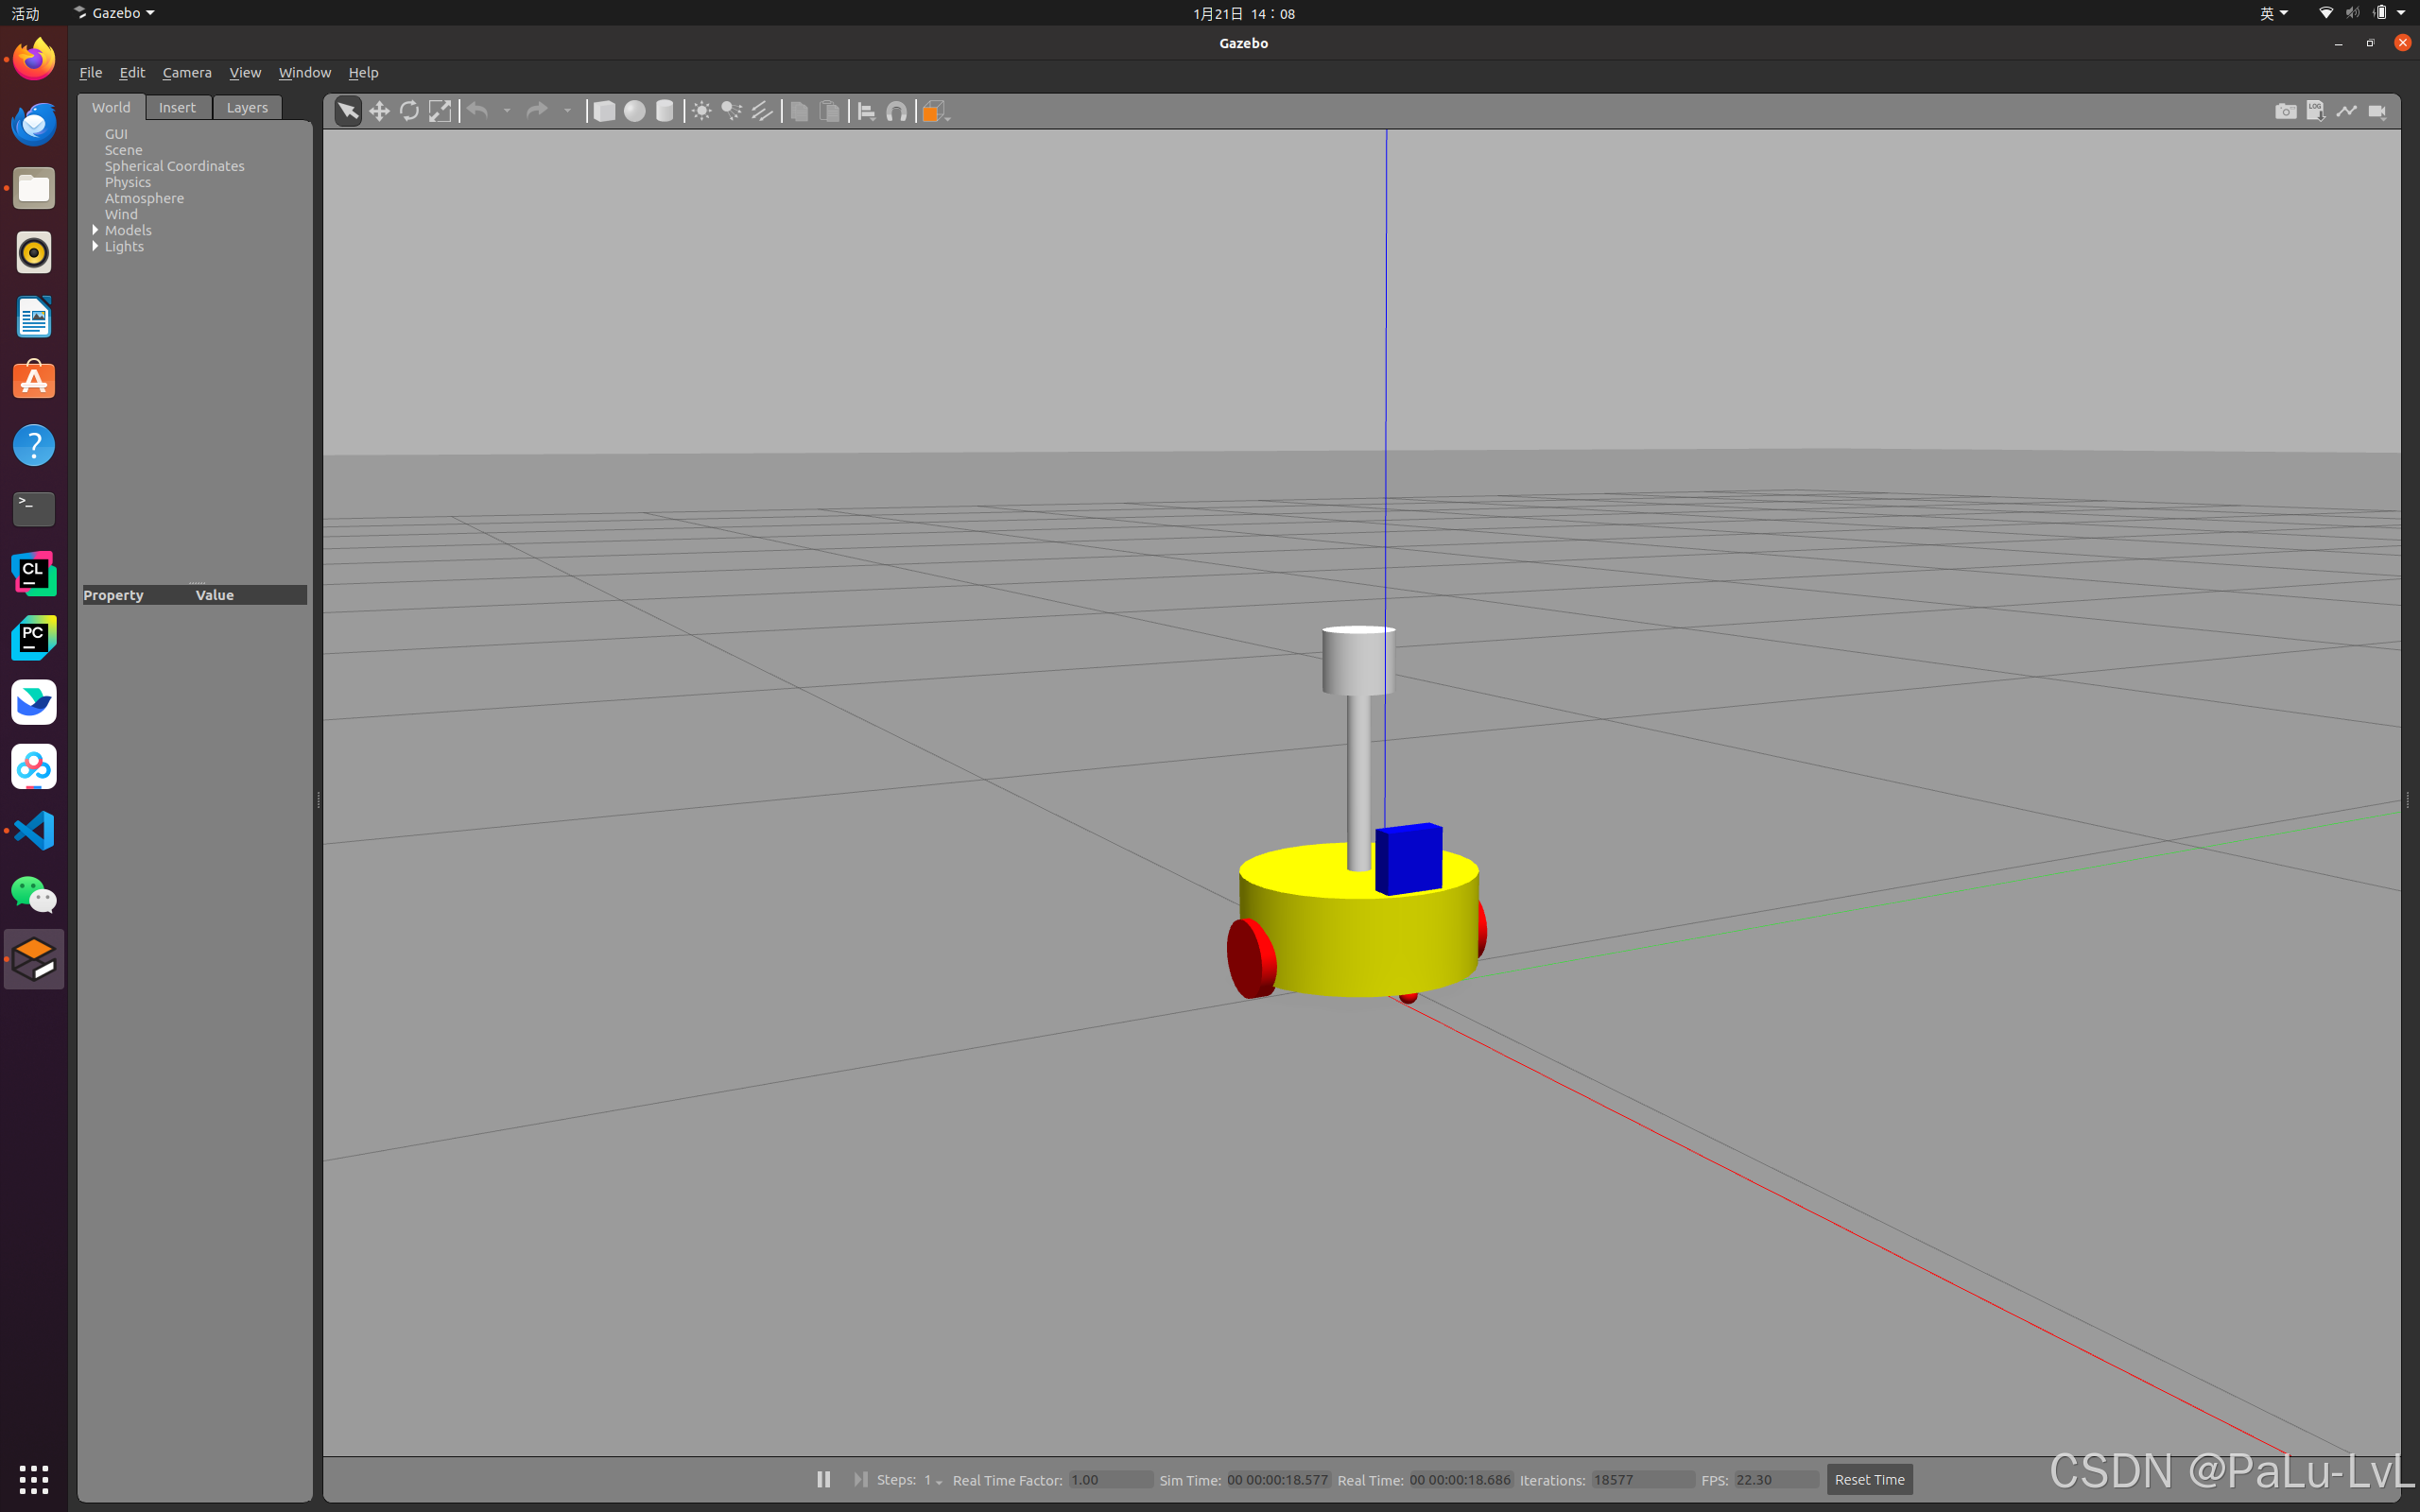
将之前的机器人模型(xacro版)显示在 gazebo中
2.实现流程
1.需要编写封装惯性矩阵算法的 xacro 文件
2.为机器人模型中的每一个 link 添加 collision 和 inertial 标签,并且重置颜色属性
3.在 launch 文件中启动 gazebo 并添加机器人模型
3.具体实现
1.封装惯性矩阵算法的 xacro 文件:inertial.xacro
<robot name="base" xmlns:xacro="http://wiki.ros.org/xacro"> <xacro:macro name="sphere_inertial_matrix" params="m r"> <inertial> <mass value="${m}" /> <inertia ixx="${2*m*r*r/5}" ixy="0" ixz="0" iyy="${2*m*r*r/5}" iyz="0" izz="${2*m*r*r/5}" /> </inertial> </xacro:macro> <xacro:macro name="cylinder_inertial_matrix" params="m r h"> <inertial> <mass value="${m}" /> <inertia ixx="${m*(3*r*r+h*h)/12}" ixy = "0" ixz = "0" iyy="${m*(3*r*r+h*h)/12}" iyz = "0" izz="${m*r*r/2}" /> </inertial> </xacro:macro> <xacro:macro name="Box_inertial_matrix" params="m l w h"> <inertial> <mass value="${m}" /> <inertia ixx="${m*(h*h + l*l)/12}" ixy = "0" ixz = "0" iyy="${m*(w*w + l*l)/12}" iyz= "0" izz="${m*(w*w + h*h)/12}" /> </inertial> </xacro:macro> </robot>
2.框架搭建
修改car_camera_lidar.xacro要包含惯性矩阵文件
<robot name = "mycar" xmlns:xacro="http://www.ros.org/wiki/xacro"> <xacro:include filename = "inertial.xacro"/> <xacro:include filename = "car.xacro"/> <xacro:include filename = "camera.xacro"/> <xacro:include filename = "lidar.xacro"/> </robot>
搭建launch文件
<launch> <!-- 将 Urdf 文件的内容加载到参数服务器 --> <param name="robot_description" command="$(find xacro)/xacro $(find urdf_rviz01)/xacro/car_camera_lidar.xacro" /> <!-- 启动 gazebo --> <include file="$(find gazebo_ros)/launch/empty_world.launch" /> <!-- 在 gazebo 中显示机器人模型 --> <node pkg="gazebo_ros" type="spawn_model" name="model" args="-urdf -model mycar -param robot_description" /> </launch>
3.为机器人模型中的每一个 link 添加 collision 和 inertial 标签,并且重置颜色属性
1.修改car.xacro
<robot name = "mycar" xmlns:xacro="http://www.ros.org/wiki/xacro"> <xacro:property name = "footfrintradius" value = "0.001"/> <xacro:property name = "base_radius" value = "0.1" /> <xacro:property name = "base_length" value = "0.08" /> <xacro:property name = "lidi" value = "0.015" /> <xacro:property name = "base_joint_z" value = "${base_length/2+ lidi }" /> <xacro:property name = "wheel_radius" value = "0.0325" /> <xacro:property name = "wheel_length" value = "0.015" /> <xacro:property name = "PI" value = "3.1415927" /> <xacro:property name = "wheel_joint_z" value = "${wheel_radius - (base_length/2 +lidi)}" /> <xacro:property name = "small_wheel_radius" value = "0.0075" /> <xacro:property name = "small_joint_z" value = "${-(base_length/2+lidi-small_wheel_radius)}" /> <link name="base_footprint"> <visual> <geometry> <sphere radius="${footfrintradius}" /> </geometry> </visual> </link> <link name="base_link"> <visual> <geometry> <cylinder radius="${base_radius}" length="${base_length}" /> </geometry> <origin xyz="0 0 0" rpy="0 0 0" /> <material name="yellow"> <color rgba="0.8 0.3 0.1 0.5" /> </material> </visual> <collision> <geometry> <cylinder radius="${base_radius}" length="${base_length}" /> </geometry> <origin xyz="0 0 0" rpy="0 0 0" /> </collision> <xacro:cylinder_inertial_matrix m = "2" r = "${base_radius}" h ="${base_length}"/> </link> <gazebo reference = "base_link"> <material>Gazebo/Yellow</material> </gazebo> <joint name="base_link2base_footprint" type="fixed"> <parent link="base_footprint" /> <child link="base_link"/> <origin xyz="0 0 ${base_joint_z}" /> </joint> <xacro:macro name = "wheel_func" params = "wheel_name flag"> <link name="${wheel_name}_wheel"> <visual> <geometry> <cylinder radius="${wheel_radius}" length="${wheel_length}" /> </geometry> <origin xyz="0 0 0" rpy="${PI / 2} 0 0" /> <material name="black"> <color rgba="0.0 0.0 0.0 1.0" /> </material> </visual> <collision> <geometry> <cylinder radius="${wheel_radius}" length="${wheel_length}" /> </geometry> <origin xyz="0 0 0" rpy="${PI / 2} 0 0" /> </collision> <xacro:cylinder_inertial_matrix m = "0.05" r = "${wheel_radius}" h = "${wheel_length}" /> </link> <gazebo reference = "${wheel_name}_wheel"> <material>Gazebo/Red</material> </gazebo> <joint name="${wheel_name}2link" type="continuous"> <parent link="base_link" /> <child link="${wheel_name}_wheel" /> <origin xyz="0 ${0.1 * flag} ${wheel_joint_z}" /> <axis xyz="0 1 0" /> </joint> </xacro:macro> <xacro:wheel_func wheel_name = "left" flag = "1"/> <xacro:wheel_func wheel_name = "right" flag = "-1"/> <xacro:macro name = "small_wheel_func" params = "small_wheel_name flag"> <link name="${small_wheel_name}_wheel"> <visual> <geometry> <sphere radius="${small_wheel_radius}" /> </geometry> <origin xyz="0 0 0" rpy="0 0 0" /> <material name="black"> <color rgba="0.0 0.0 0.0 1.0" /> </material> </visual> <collision> <geometry> <sphere radius="${small_wheel_radius}" /> </geometry> <origin xyz="0 0 0" rpy="0 0 0" /> </collision> <xacro:sphere_inertial_matrix m = "0.01" r = "${small_wheel_radius}"/> </link> <gazebo reference = "${small_wheel_name}_wheel"> <material>Gazebo/Red</material> </gazebo> <joint name="${small_wheel_name}2link" type="continuous"> <parent link="base_link" /> <child link="${small_wheel_name}_wheel" /> <origin xyz="${0.08*flag} 0 ${small_joint_z}" /> <axis xyz="1 1 1" /> </joint> </xacro:macro> <xacro:small_wheel_func small_wheel_name = "front" flag = "1"/> <xacro:small_wheel_func small_wheel_name = "back" flag = "-1"/> </robot>
2.修改camera.xacro
<robot name = "my_camera" xmlns:xacro="http://www.ros.org/wiki/xacro"> <xacro:property name = "camera_x" value = "0.02" /> <xacro:property name = "camera_y" value = "0.05" /> <xacro:property name = "camera_z" value = "0.05" /> <xacro:property name = "joint_camera_x" value = "0.08" /> <xacro:property name = "joint_camera_y" value = "0" /> <xacro:property name = "base_length" value = "0.08" /> <xacro:property name = "joint_camera_z" value = "${camera_z /2 +base_length/2 }" /> <link name="camera"> <visual> <geometry> <box size="${camera_x} ${camera_y} ${camera_z}"/> </geometry> <material name = "no" > <color rgba = "3 3 3 0.3"/> </material> </visual> <collision> <geometry> <box size="${camera_x} ${camera_y} ${camera_z}"/> </geometry> </collision> <xacro:Box_inertial_matrix m = "0.01" l= "${camera_x}" w="${camera_y}" h="${camera_z}" /> </link> <gazebo reference = "camera"> <material>Gazebo/Blue</material> </gazebo> <joint name="camera2baselink" type="fixed"> <origin xyz="${joint_camera_x} ${joint_camera_y} ${joint_camera_z}" rpy="0.0 0.0 0.0"/> <parent link="base_link"/> <child link="camera"/> <axis xyz="0.0 0.0 0.0"/> </joint> </robot>
3.修改lidar.xacro
<robot name = "mylaser" xmlns:xacro="http://www.ros.org/wiki/xacro"> <xacro:property name = "support_radius" value = "0.01" /> <xacro:property name = "support_length" value = "0.15" /> <xacro:property name = "laser_radius" value = "0.03" /> <xacro:property name = "laser_length" value = "0.05" /> <xacro:property name = "joint_support_x" value = "0.00" /> <xacro:property name = "joint_support_y" value = "0.00" /> <xacro:property name = "joint_support_z" value = "${base_length / 2 +support_length / 2}" /> <xacro:property name = "joint_laser_x" value = "0.00" /> <xacro:property name = "joint_laser_y" value = "0.00" /> <xacro:property name = "joint_laser_z" value = "${support_length/2 + laser_length/2}" /> <link name="support"> <visual> <origin xyz="0.0 0.0 0.0" rpy="0.0 0.0 0.0"/> <geometry> <cylinder radius = "${support_radius}" length = "${support_length}"/> </geometry> <material name="sha"> <color rgba="0.8 0.5 0.0 0.5"/> </material> </visual> <collision> <geometry> <cylinder radius = "${support_radius}" length = "${support_length}"/> </geometry> </collision> <xacro:cylinder_inertial_matrix m = "0.1" r = "${support_radius}" h="${support_length}" /> </link> <gazebo reference = "support"> <material>Gazebo/Grey</material> </gazebo> <joint name="support2base" type="fixed"> <parent link = "base_link"/> <child link = "support" /> <origin xyz = "${joint_support_x} ${joint_support_y} ${joint_support_z}" rpy = "0 0 0" /> </joint> <link name="laser"> <visual> <origin xyz="0.0 0.0 0.0" rpy="0.0 0.0 0.0"/> <geometry> <cylinder radius = "${laser_radius}" length = "${laser_length}"/> </geometry> <material name="shav"> <color rgba="0.0 0.0 0.0 0.5"/> </material> </visual> <collision> <geometry> <cylinder radius = "${laser_radius}" length = "${laser_length}"/> </geometry> </collision> <xacro:cylinder_inertial_matrix m = "0.15" r = "${laser_radius}" h = "${laser_length}"/> </link> <gazebo reference = "laser"> <material>Gazebo/Black</material> </gazebo> <joint name="laser2support" type="fixed"> <parent link = "support"/> <child link = "laser" /> <origin xyz = "${joint_laser_x} ${joint_laser_y} ${joint_laser_z}" rpy = "0 0 0" /> </joint> </robot>
5.Gazebo仿真环境搭建
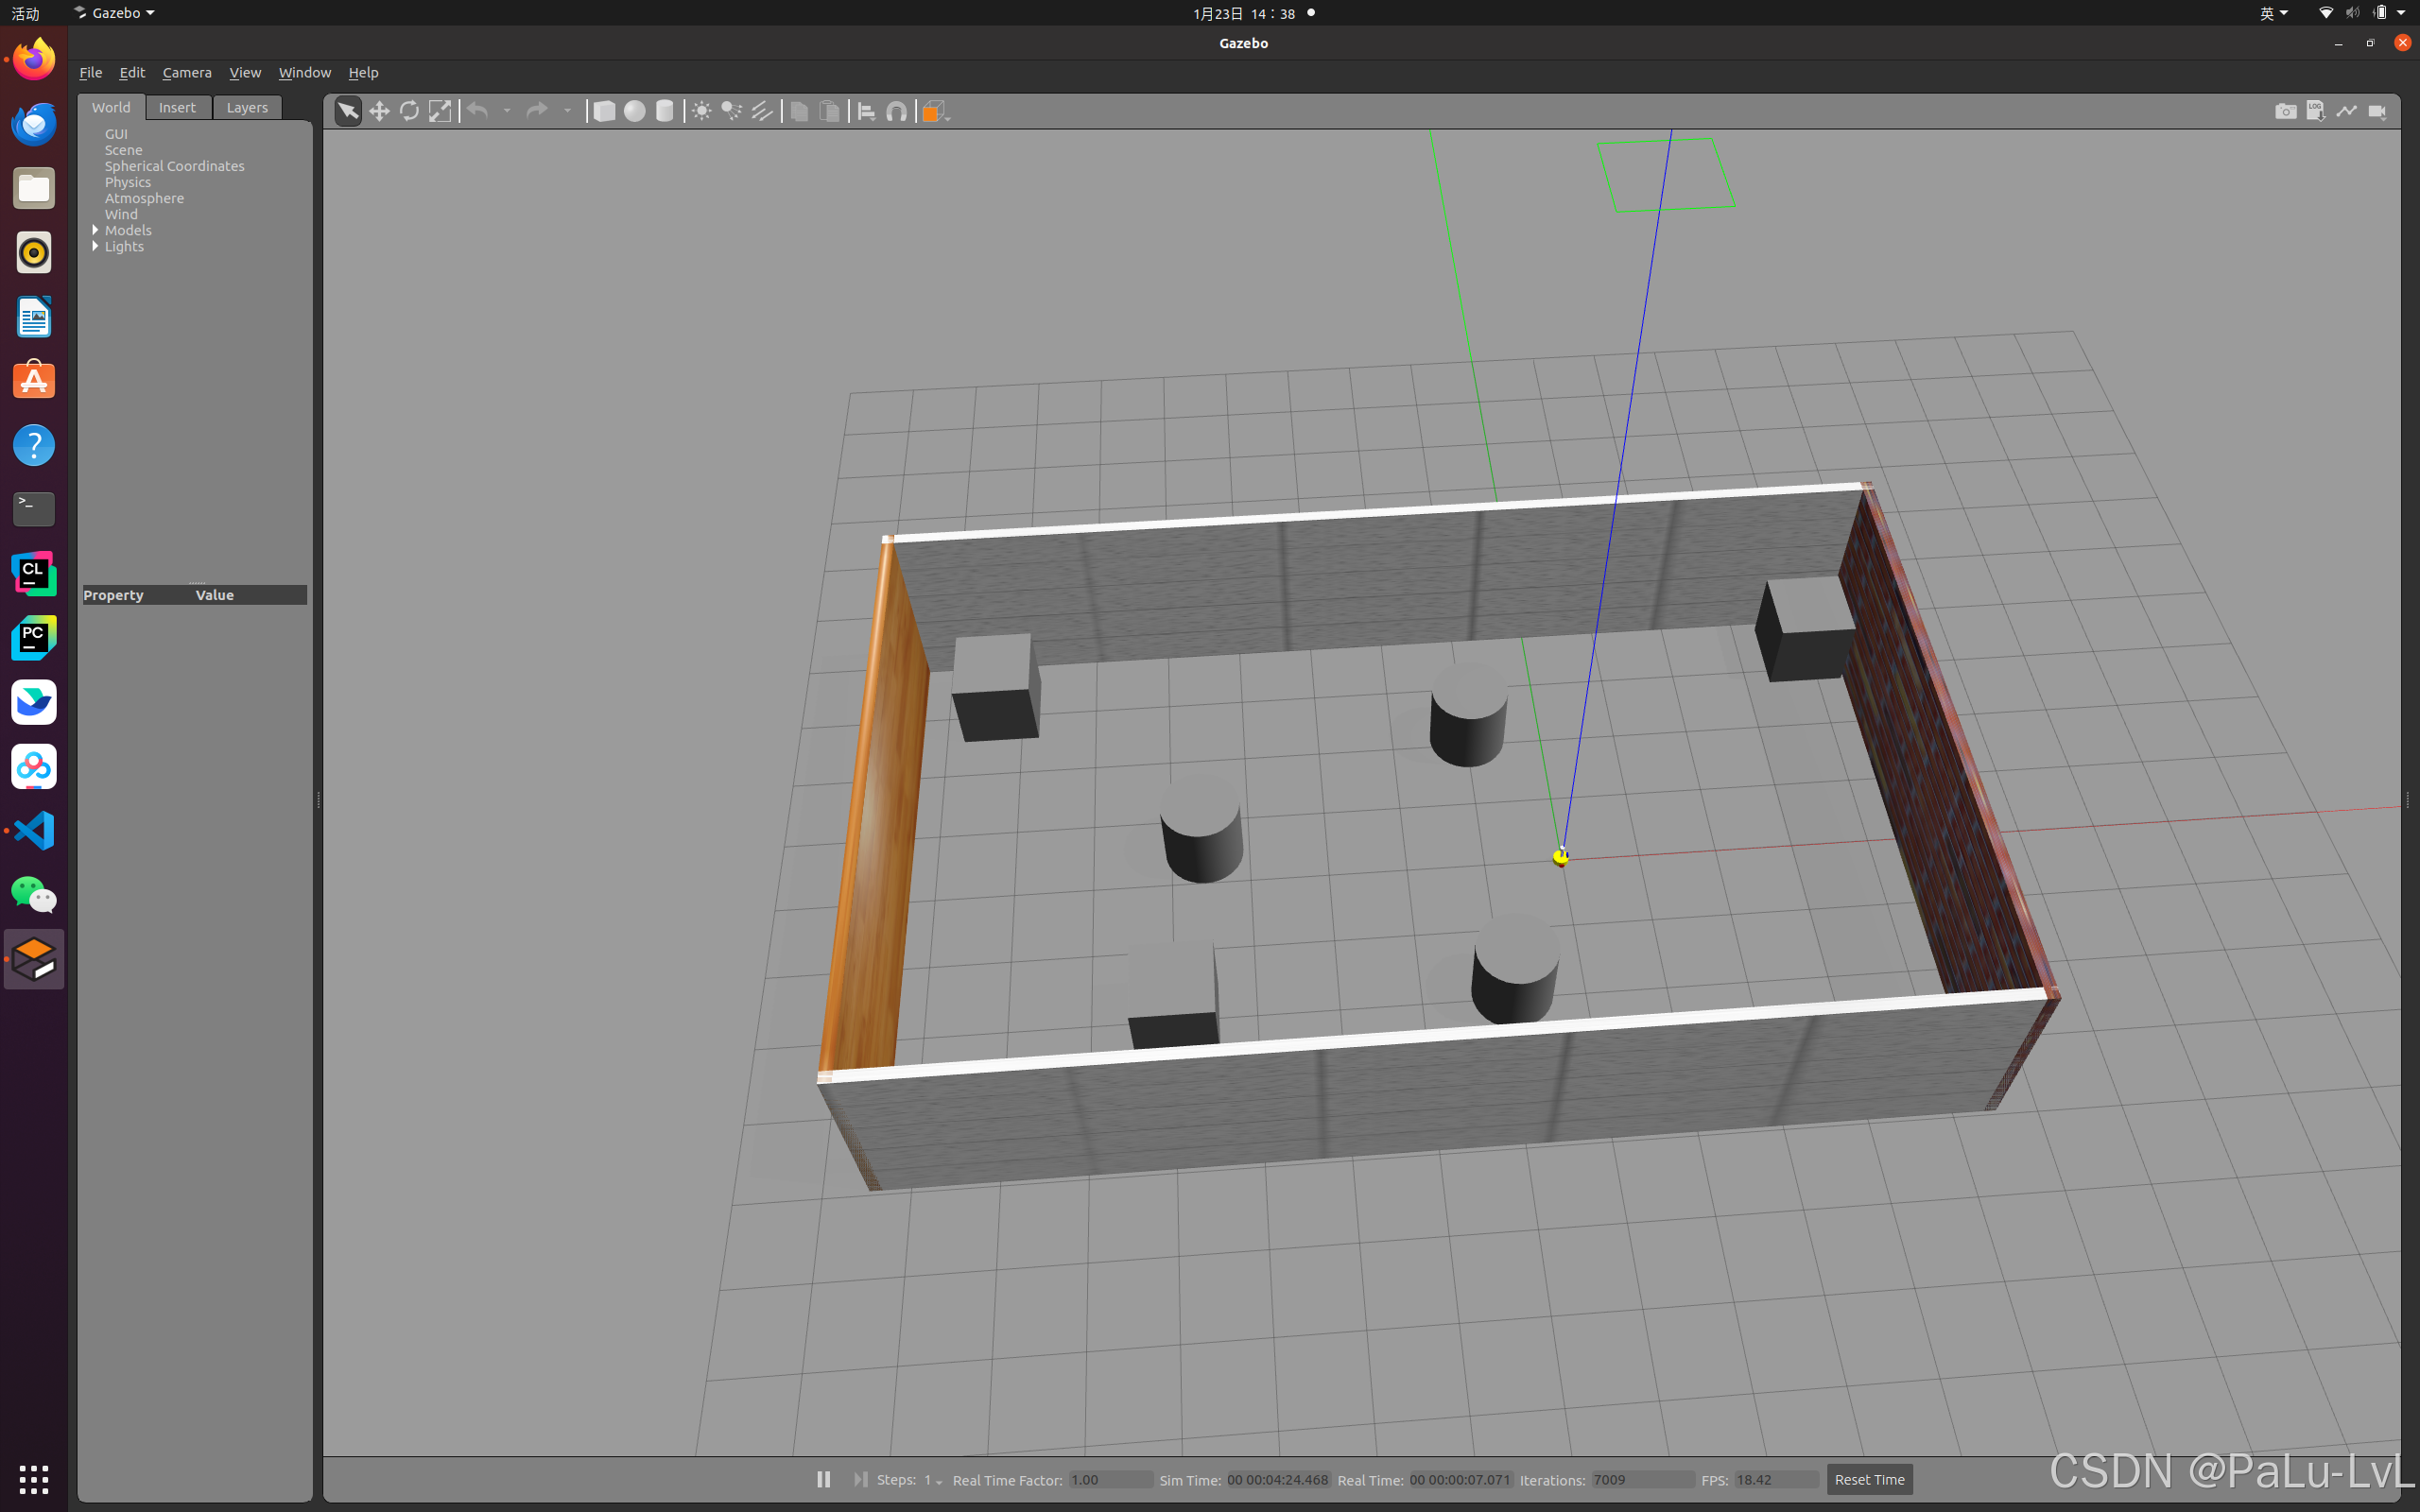
1.如何导入外置world文件
新建立文件夹,导入world文件,修改launch文件
源码在这里
<sdf version='1.7'> <world name='default'> <light name='sun' type='directional'> <cast_shadows>1</cast_shadows> <pose>0 0 10 0 -0 0</pose> <diffuse>0.8 0.8 0.8 1</diffuse> <specular>0.2 0.2 0.2 1</specular> <attenuation> <range>1000</range> <constant>0.9</constant> <linear>0.01</linear> <quadratic>0.001</quadratic> </attenuation> <direction>-0.5 0.1 -0.9</direction> <spot> <inner_angle>0</inner_angle> <outer_angle>0</outer_angle> <falloff>0</falloff> </spot> </light> <model name='ground_plane'> <static>1</static> <link name='link'> <collision name='collision'> <geometry> <plane> <normal>0 0 1</normal> <size>100 100</size> </plane> </geometry> <surface> <contact> <collide_bitmask>65535</collide_bitmask> <ode/> </contact> <friction> <ode> <mu>100</mu> <mu2>50</mu2> </ode> <torsional> <ode/> </torsional> </friction> <bounce/> </surface> <max_contacts>10</max_contacts> </collision> <visual name='visual'> <cast_shadows>0</cast_shadows> <geometry> <plane> <normal>0 0 1</normal> <size>100 100</size> </plane> </geometry> <material> <script> <uri>file://media/materials/scripts/gazebo.material</uri> <name>Gazebo/Grey</name> </script> </material> </visual> <self_collide>0</self_collide> <enable_wind>0</enable_wind> <kinematic>0</kinematic> </link> </model> <gravity>0 0 -9.8</gravity> <magnetic_field>6e-06 2.3e-05 -4.2e-05</magnetic_field> <atmosphere type='adiabatic'/> <physics type='ode'> <max_step_size>0.001</max_step_size> <real_time_factor>1</real_time_factor> <real_time_update_rate>1000</real_time_update_rate> </physics> <scene> <ambient>0.4 0.4 0.4 1</ambient> <background>0.7 0.7 0.7 1</background> <shadows>1</shadows> </scene> <wind/> <spherical_coordinates> <surface_model>EARTH_WGS84</surface_model> <latitude_deg>0</latitude_deg> <longitude_deg>0</longitude_deg> <elevation>0</elevation> <heading_deg>0</heading_deg> </spherical_coordinates> <model name='box_house'> <pose>-1.97643 0.059964 0 0 -0 0</pose> <link name='Wall_1'> <collision name='Wall_1_Collision'> <geometry> <box> <size>13 0.15 2.5</size> </box> </geometry> <pose>0 0 1.25 0 -0 0</pose> <surface> <contact> <ode/> </contact> <bounce/> <friction> <torsional> <ode/> </torsional> <ode/> </friction> </surface> <max_contacts>10</max_contacts> </collision> <visual name='Wall_1_Visual'> <pose>0 0 1.25 0 -0 0</pose> <geometry> <box> <size>13 0.15 2.5</size> </box> </geometry> <material> <script> <uri>file://media/materials/scripts/gazebo.material</uri> <name>Gazebo/CeilingTiled</name> </script> <ambient>1 1 1 1</ambient> </material> <meta> <layer>0</layer> </meta> </visual> <pose>0 3.925 0 0 -0 0</pose> <self_collide>0</self_collide> <enable_wind>0</enable_wind> <kinematic>0</kinematic> </link> <link name='Wall_2'> <collision name='Wall_2_Collision'> <geometry> <box> <size>8 0.15 2.5</size> </box> </geometry> <pose>0 0 1.25 0 -0 0</pose> <surface> <contact> <ode/> </contact> <bounce/> <friction> <torsional> <ode/> </torsional> <ode/> </friction> </surface> <max_contacts>10</max_contacts> </collision> <visual name='Wall_2_Visual'> <pose>0 0 1.25 0 -0 0</pose> <geometry> <box> <size>8 0.15 2.5</size> </box> </geometry> <material> <script> <uri>file://media/materials/scripts/gazebo.material</uri> <name>Gazebo/Bricks</name> </script> <ambient>1 1 1 1</ambient> </material> <meta> <layer>0</layer> </meta> </visual> <pose>6.425 -0 0 0 -0 -1.5708</pose> <self_collide>0</self_collide> <enable_wind>0</enable_wind> <kinematic>0</kinematic> </link> <link name='Wall_3'> <collision name='Wall_3_Collision'> <geometry> <box> <size>13 0.15 2.5</size> </box> </geometry> <pose>0 0 1.25 0 -0 0</pose> <surface> <contact> <ode/> </contact> <bounce/> <friction> <torsional> <ode/> </torsional> <ode/> </friction> </surface> <max_contacts>10</max_contacts> </collision> <visual name='Wall_3_Visual'> <pose>0 0 1.25 0 -0 0</pose> <geometry> <box> <size>13 0.15 2.5</size> </box> </geometry> <material> <script> <uri>file://media/materials/scripts/gazebo.material</uri> <name>Gazebo/CeilingTiled</name> </script> <ambient>1 1 1 1</ambient> </material> <meta> <layer>0</layer> </meta> </visual> <pose>0 -3.925 0 0 -0 3.14159</pose> <self_collide>0</self_collide> <enable_wind>0</enable_wind> <kinematic>0</kinematic> </link> <link name='Wall_4'> <collision name='Wall_4_Collision'> <geometry> <box> <size>8 0.15 2.5</size> </box> </geometry> <pose>0 0 1.25 0 -0 0</pose> <surface> <contact> <ode/> </contact> <bounce/> <friction> <torsional> <ode/> </torsional> <ode/> </friction> </surface> <max_contacts>10</max_contacts> </collision> <visual name='Wall_4_Visual'> <pose>0 0 1.25 0 -0 0</pose> <geometry> <box> <size>8 0.15 2.5</size> </box> </geometry> <material> <script> <uri>file://media/materials/scripts/gazebo.material</uri> <name>Gazebo/Wood</name> </script> <ambient>1 1 1 1</ambient> </material> <meta> <layer>0</layer> </meta> </visual> <pose>-6.425 -0 0 0 -0 1.5708</pose> <self_collide>0</self_collide> <enable_wind>0</enable_wind> <kinematic>0</kinematic> </link> <static>1</static> </model> <model name='unit_box'> <pose>-7.27143 3.09748 0.5 0 -0 0</pose> <link name='link'> <inertial> <mass>1</mass> <inertia> <ixx>0.166667</ixx> <ixy>0</ixy> <ixz>0</ixz> <iyy>0.166667</iyy> <iyz>0</iyz> <izz>0.166667</izz> </inertia> <pose>0 0 0 0 -0 0</pose> </inertial> <collision name='collision'> <geometry> <box> <size>1 1 1</size> </box> </geometry> <surface> <contact> <ode/> </contact> <bounce/> <friction> <torsional> <ode/> </torsional> <ode/> </friction> </surface> <max_contacts>10</max_contacts> </collision> <visual name='visual'> <geometry> <box> <size>1 1 1</size> </box> </geometry> <material> <script> <name>Gazebo/Grey</name> <uri>file://media/materials/scripts/gazebo.material</uri> </script> </material> </visual> <self_collide>0</self_collide> <enable_wind>0</enable_wind> <kinematic>0</kinematic> </link> </model> <model name='unit_cylinder'> <pose>-4.57746 0.509886 0.5 0 -0 0</pose> <link name='link'> <inertial> <mass>1</mass> <inertia> <ixx>0.145833</ixx> <ixy>0</ixy> <ixz>0</ixz> <iyy>0.145833</iyy> <iyz>0</iyz> <izz>0.125</izz> </inertia> <pose>0 0 0 0 -0 0</pose> </inertial> <collision name='collision'> <geometry> <cylinder> <radius>0.5</radius> <length>1</length> </cylinder> </geometry> <surface> <contact> <ode/> </contact> <bounce/> <friction> <torsional> <ode/> </torsional> <ode/> </friction> </surface> <max_contacts>10</max_contacts> </collision> <visual name='visual'> <geometry> <cylinder> <radius>0.5</radius> <length>1</length> </cylinder> </geometry> <material> <script> <name>Gazebo/Grey</name> <uri>file://media/materials/scripts/gazebo.material</uri> </script> </material> </visual> <self_collide>0</self_collide> <enable_wind>0</enable_wind> <kinematic>0</kinematic> </link> </model> <state world_name='default'> <sim_time>257 459000000</sim_time> <real_time>196 129745222</real_time> <wall_time>1593764309 76438721</wall_time> <iterations>194518</iterations> <model name='box_house'> <pose>-1.97643 0.05996 0 0 -0 0</pose> <scale>1 1 1</scale> <link name='Wall_1'> <pose>-1.97643 3.98496 0 0 -0 0</pose> <velocity>0 0 0 0 -0 0</velocity> <acceleration>0 0 0 0 -0 0</acceleration> <wrench>0 0 0 0 -0 0</wrench> </link> <link name='Wall_2'> <pose>4.44857 0.059964 0 0 0 -1.5708</pose> <velocity>0 0 0 0 -0 0</velocity> <acceleration>0 0 0 0 -0 0</acceleration> <wrench>0 0 0 0 -0 0</wrench> </link> <link name='Wall_3'> <pose>-1.97643 -3.86504 0 0 -0 3.14159</pose> <velocity>0 0 0 0 -0 0</velocity> <acceleration>0 0 0 0 -0 0</acceleration> <wrench>0 0 0 0 -0 0</wrench> </link> <link name='Wall_4'> <pose>-8.40143 0.059964 0 0 -0 1.5708</pose> <velocity>0 0 0 0 -0 0</velocity> <acceleration>0 0 0 0 -0 0</acceleration> <wrench>0 0 0 0 -0 0</wrench> </link> </model> <model name='ground_plane'> <pose>0 0 0 0 -0 0</pose> <scale>1 1 1</scale> <link name='link'> <pose>0 0 0 0 -0 0</pose> <velocity>0 0 0 0 -0 0</velocity> <acceleration>0 0 0 0 -0 0</acceleration> <wrench>0 0 0 0 -0 0</wrench> </link> </model> <model name='unit_box'> <pose>-7.27142 3.09748 0.499995 0 1e-05 0</pose> <scale>1 1 1</scale> <link name='link'> <pose>-7.27142 3.09748 0.499995 0 1e-05 0</pose> <velocity>0 0 0 0 -0 0</velocity> <acceleration>0.010615 -0.006191 -9.78231 0.012424 0.021225 1.8e-05</acceleration> <wrench>0.010615 -0.006191 -9.78231 0 -0 0</wrench> </link> </model> <model name='unit_box_0'> <pose>-4.96407 -2.00353 0.499995 -1e-05 -0 -0</pose> <scale>1 1 1</scale> <link name='link'> <pose>-4.96407 -2.00353 0.499995 -1e-05 -0 -0</pose> <velocity>0 0 0 0 -0 0</velocity> <acceleration>0.004709 0.011055 -9.78158 -0.022108 0.009414 1e-06</acceleration> <wrench>0.004709 0.011055 -9.78158 0 -0 0</wrench> </link> </model> <model name='unit_box_1'> <pose>3.83312 3.3034 0.499995 0 1e-05 0</pose> <scale>1 1 1</scale> <link name='link'> <pose>3.83312 3.3034 0.499995 0 1e-05 0</pose> <velocity>0 0 0 0 -0 0</velocity> <acceleration>0.010615 -0.006191 -9.78231 0.012424 0.021225 1.8e-05</acceleration> <wrench>0.010615 -0.006191 -9.78231 0 -0 0</wrench> </link> </model> <model name='unit_cylinder'> <pose>-4.57746 0.509884 0.499998 3e-06 4e-06 -0</pose> <scale>1 1 1</scale> <link name='link'> <pose>-4.57746 0.509884 0.499998 3e-06 4e-06 -0</pose> <velocity>0 0 0 0 -0 0</velocity> <acceleration>0 0 -9.8 0 -0 0</acceleration> <wrench>0 0 -9.8 0 -0 0</wrench> </link> </model> <model name='unit_cylinder_0'> <pose>-0.988146 2.12658 0.499993 -3e-06 -4e-06 -0</pose> <scale>1 1 1</scale> <link name='link'> <pose>-0.988146 2.12658 0.499993 -3e-06 -4e-06 -0</pose> <velocity>0 0 0 0 -0 0</velocity> <acceleration>0 0 -9.8 0 -0 0</acceleration> <wrench>0 0 -9.8 0 -0 0</wrench> </link> </model> <model name='unit_cylinder_1'> <pose>-0.890576 -1.90634 0.499997 3e-06 4e-06 -0</pose> <scale>1 1 1</scale> <link name='link'> <pose>-0.890576 -1.90634 0.499997 3e-06 4e-06 -0</pose> <velocity>0 0 0 0 -0 0</velocity> <acceleration>0 0 -9.8 0 -0 0</acceleration> <wrench>0 0 -9.8 0 -0 0</wrench> </link> </model> <light name='sun'> <pose>0 0 10 0 -0 0</pose> </light> </state> <gui fullscreen='0'> <camera name='user_camera'> <pose>-2.68744 -4.4037 20.9537 -0 1.31164 1.40819</pose> <view_controller>orbit</view_controller> <projection_type>perspective</projection_type> </camera> </gui> <model name='unit_box_0'> <pose>-4.96407 -2.00354 0.5 0 -0 0</pose> <link name='link'> <inertial> <mass>1</mass> <inertia> <ixx>0.166667</ixx> <ixy>0</ixy> <ixz>0</ixz> <iyy>0.166667</iyy> <iyz>0</iyz> <izz>0.166667</izz> </inertia> <pose>0 0 0 0 -0 0</pose> </inertial> <collision name='collision'> <geometry> <box> <size>1 1 1</size> </box> </geometry> <surface> <contact> <ode/> </contact> <bounce/> <friction> <torsional> <ode/> </torsional> <ode/> </friction> </surface> <max_contacts>10</max_contacts> </collision> <visual name='visual'> <geometry> <box> <size>1 1 1</size> </box> </geometry> <material> <script> <name>Gazebo/Grey</name> <uri>file://media/materials/scripts/gazebo.material</uri> </script> </material> </visual> <self_collide>0</self_collide> <enable_wind>0</enable_wind> <kinematic>0</kinematic> </link> </model> <model name='unit_box_1'> <pose>3.83312 3.3034 0.5 0 -0 0</pose> <link name='link'> <inertial> <mass>1</mass> <inertia> <ixx>0.166667</ixx> <ixy>0</ixy> <ixz>0</ixz> <iyy>0.166667</iyy> <iyz>0</iyz> <izz>0.166667</izz> </inertia> <pose>0 0 0 0 -0 0</pose> </inertial> <collision name='collision'> <geometry> <box> <size>1 1 1</size> </box> </geometry> <surface> <contact> <ode/> </contact> <bounce/> <friction> <torsional> <ode/> </torsional> <ode/> </friction> </surface> <max_contacts>10</max_contacts> </collision> <visual name='visual'> <geometry> <box> <size>1 1 1</size> </box> </geometry> <material> <script> <name>Gazebo/Grey</name> <uri>file://media/materials/scripts/gazebo.material</uri> </script> </material> </visual> <self_collide>0</self_collide> <enable_wind>0</enable_wind> <kinematic>0</kinematic> </link> </model> <model name='unit_cylinder_0'> <pose>-0.988144 2.12658 0.5 0 -0 0</pose> <link name='link'> <inertial> <mass>1</mass> <inertia> <ixx>0.145833</ixx> <ixy>0</ixy> <ixz>0</ixz> <iyy>0.145833</iyy> <iyz>0</iyz> <izz>0.125</izz> </inertia> <pose>0 0 0 0 -0 0</pose> </inertial> <collision name='collision'> <geometry> <cylinder> <radius>0.5</radius> <length>1</length> </cylinder> </geometry> <surface> <contact> <ode/> </contact> <bounce/> <friction> <torsional> <ode/> </torsional> <ode/> </friction> </surface> <max_contacts>10</max_contacts> </collision> <visual name='visual'> <geometry> <cylinder> <radius>0.5</radius> <length>1</length> </cylinder> </geometry> <material> <script> <name>Gazebo/Grey</name> <uri>file://media/materials/scripts/gazebo.material</uri> </script> </material> </visual> <self_collide>0</self_collide> <enable_wind>0</enable_wind> <kinematic>0</kinematic> </link> </model> <model name='unit_cylinder_1'> <pose>-0.890578 -1.90634 0.5 0 -0 0</pose> <link name='link'> <inertial> <mass>1</mass> <inertia> <ixx>0.145833</ixx> <ixy>0</ixy> <ixz>0</ixz> <iyy>0.145833</iyy> <iyz>0</iyz> <izz>0.125</izz> </inertia> <pose>0 0 0 0 -0 0</pose> </inertial> <collision name='collision'> <geometry> <cylinder> <radius>0.5</radius> <length>1</length> </cylinder> </geometry> <surface> <contact> <ode/> </contact> <bounce/> <friction> <torsional> <ode/> </torsional> <ode/> </friction> </surface> <max_contacts>10</max_contacts> </collision> <visual name='visual'> <geometry> <cylinder> <radius>0.5</radius> <length>1</length> </cylinder> </geometry> <material> <script> <name>Gazebo/Grey</name> <uri>file://media/materials/scripts/gazebo.material</uri> </script> </material> </visual> <self_collide>0</self_collide> <enable_wind>0</enable_wind> <kinematic>0</kinematic> </link> </model> </world> </sdf>

<launch> <!-- 将 Urdf 文件的内容加载到参数服务器 --> <param name="robot_description" command="$(find xacro)/xacro $(find urdf_rviz01)/xacro/car_camera_lidar.xacro" /> <!-- 启动 gazebo name名称固定 value定位--> <include file="$(find gazebo_ros)/launch/empty_world.launch" > <arg name = "world_name" value = "$(find urdf_rviz01)/worlds/box_house.world" /> </include> <!-- 在 gazebo 中显示机器人模型 --> <node pkg="gazebo_ros" type="spawn_model" name="model" args="-urdf -model mycar -param robot_description" /> </launch>
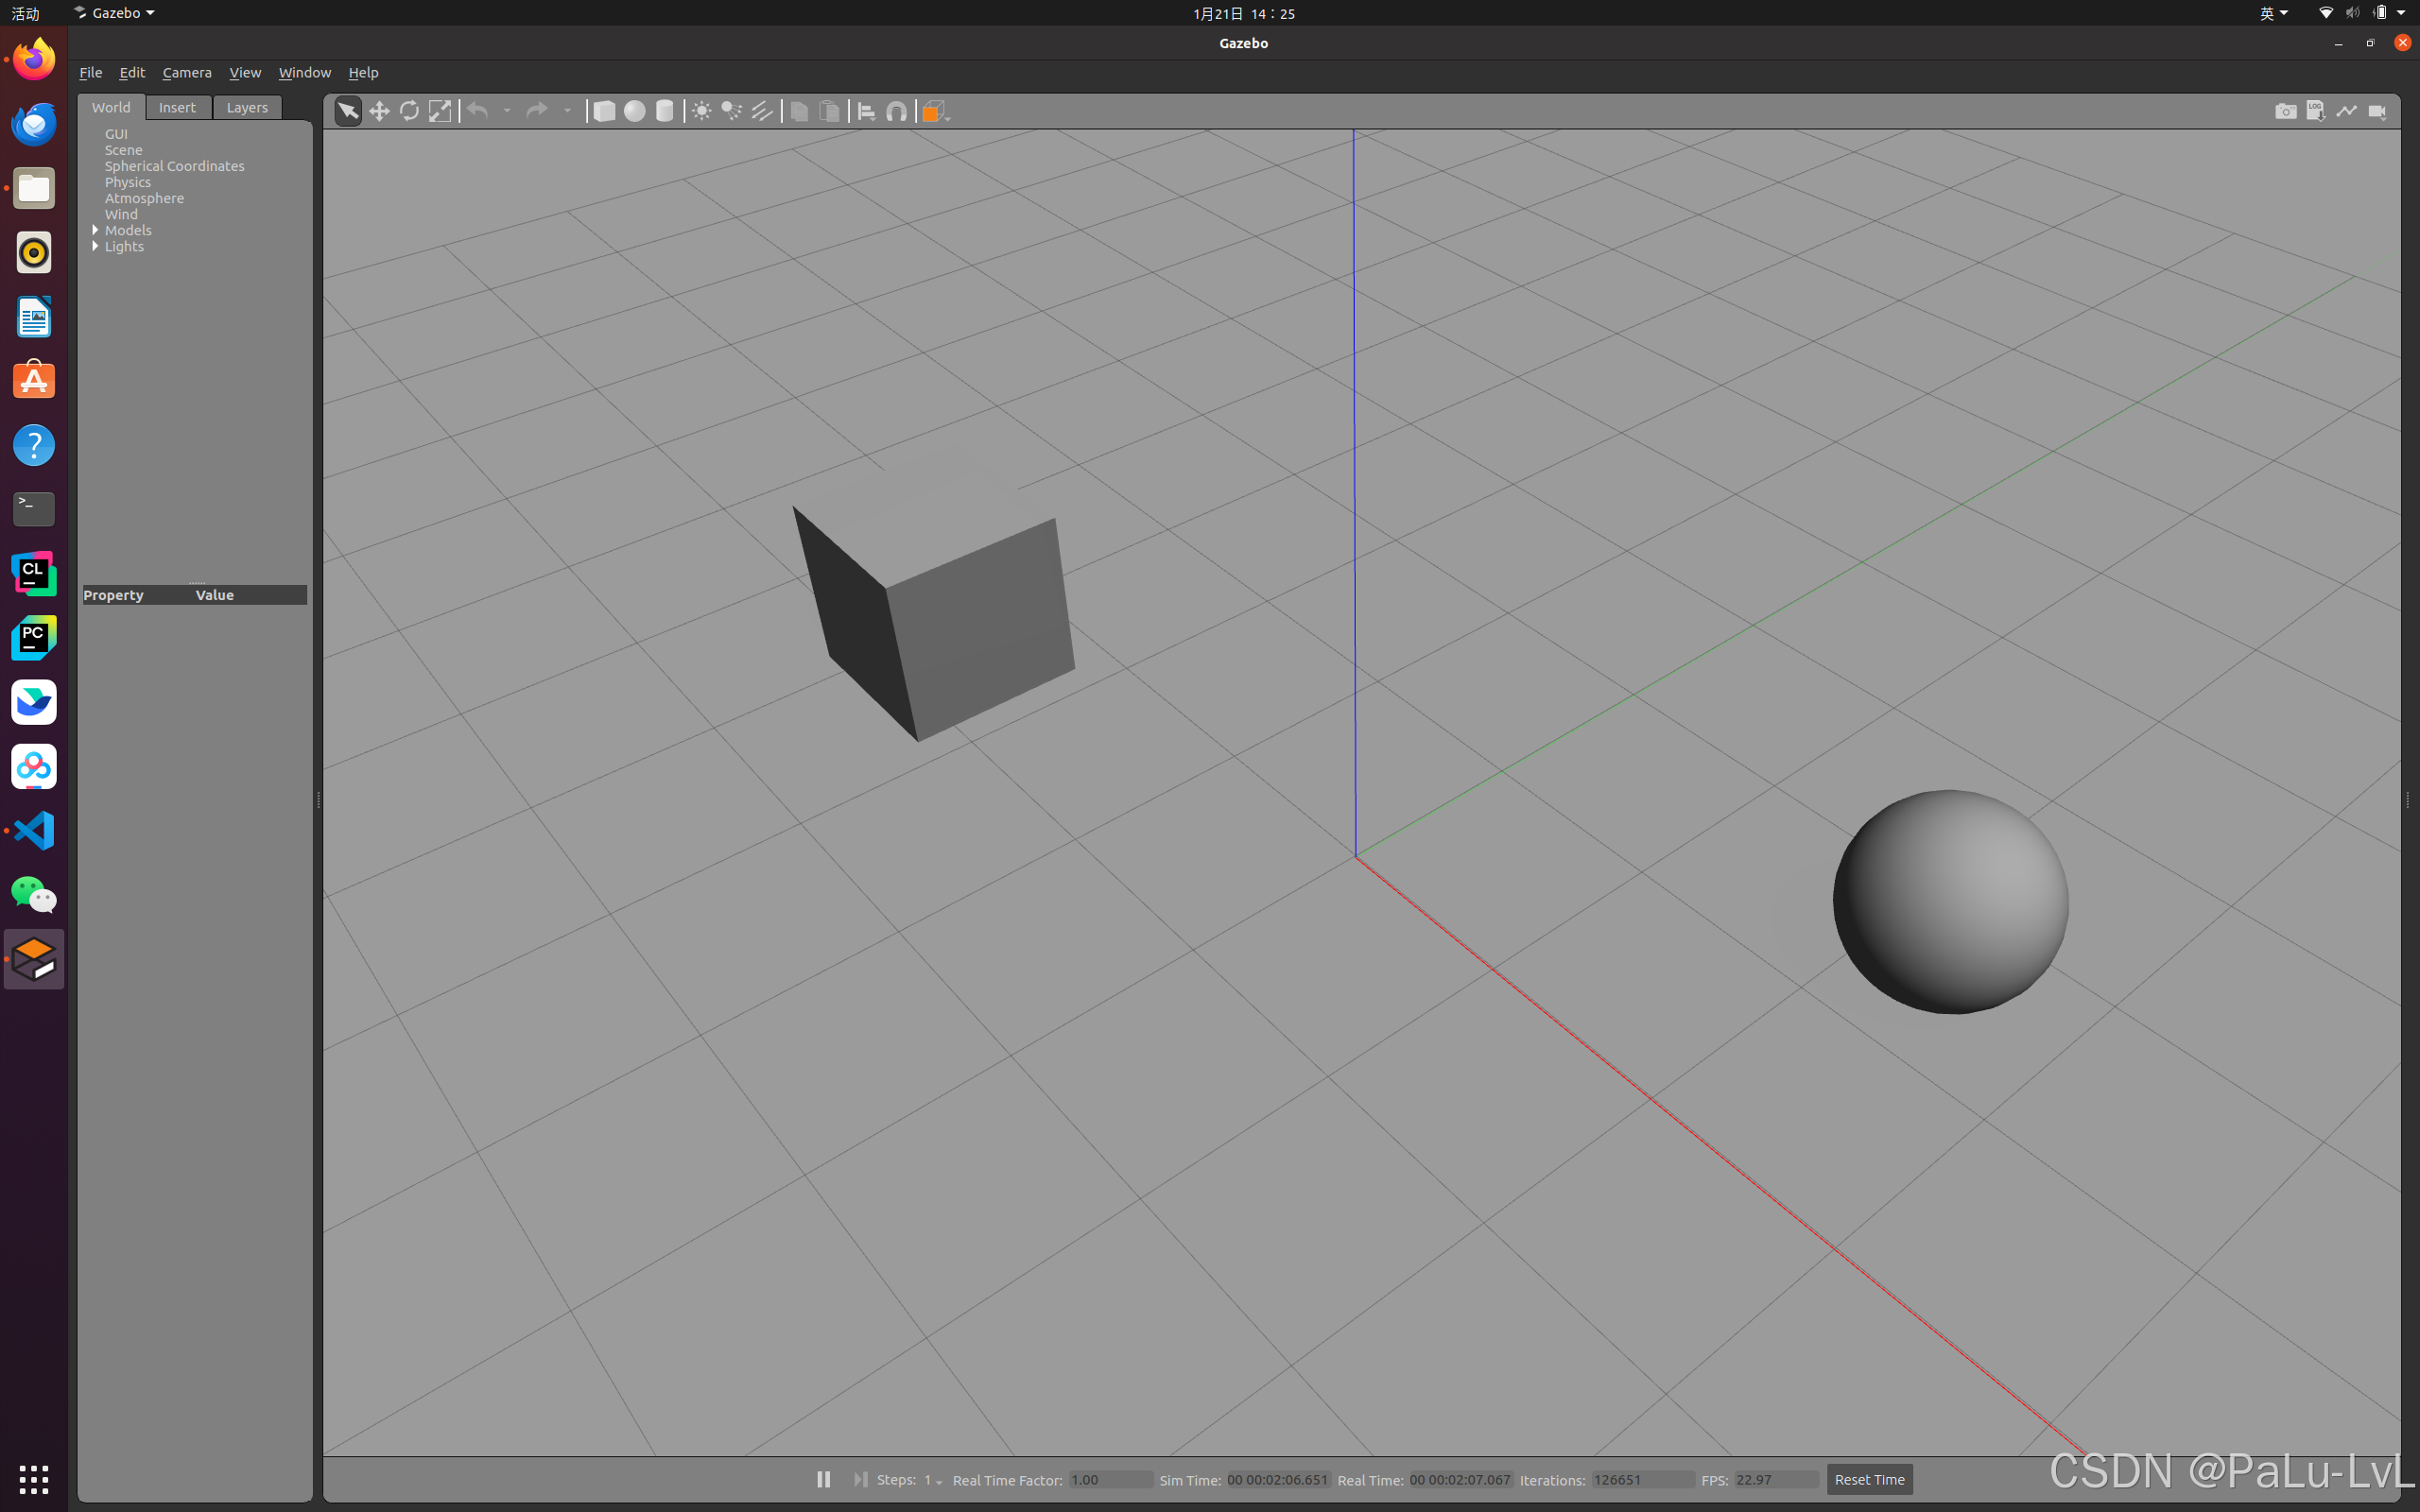
2.如何搭建仿真环境
首先要启动仿真环境
rosrun gazebo_ros gazebo
开始画图
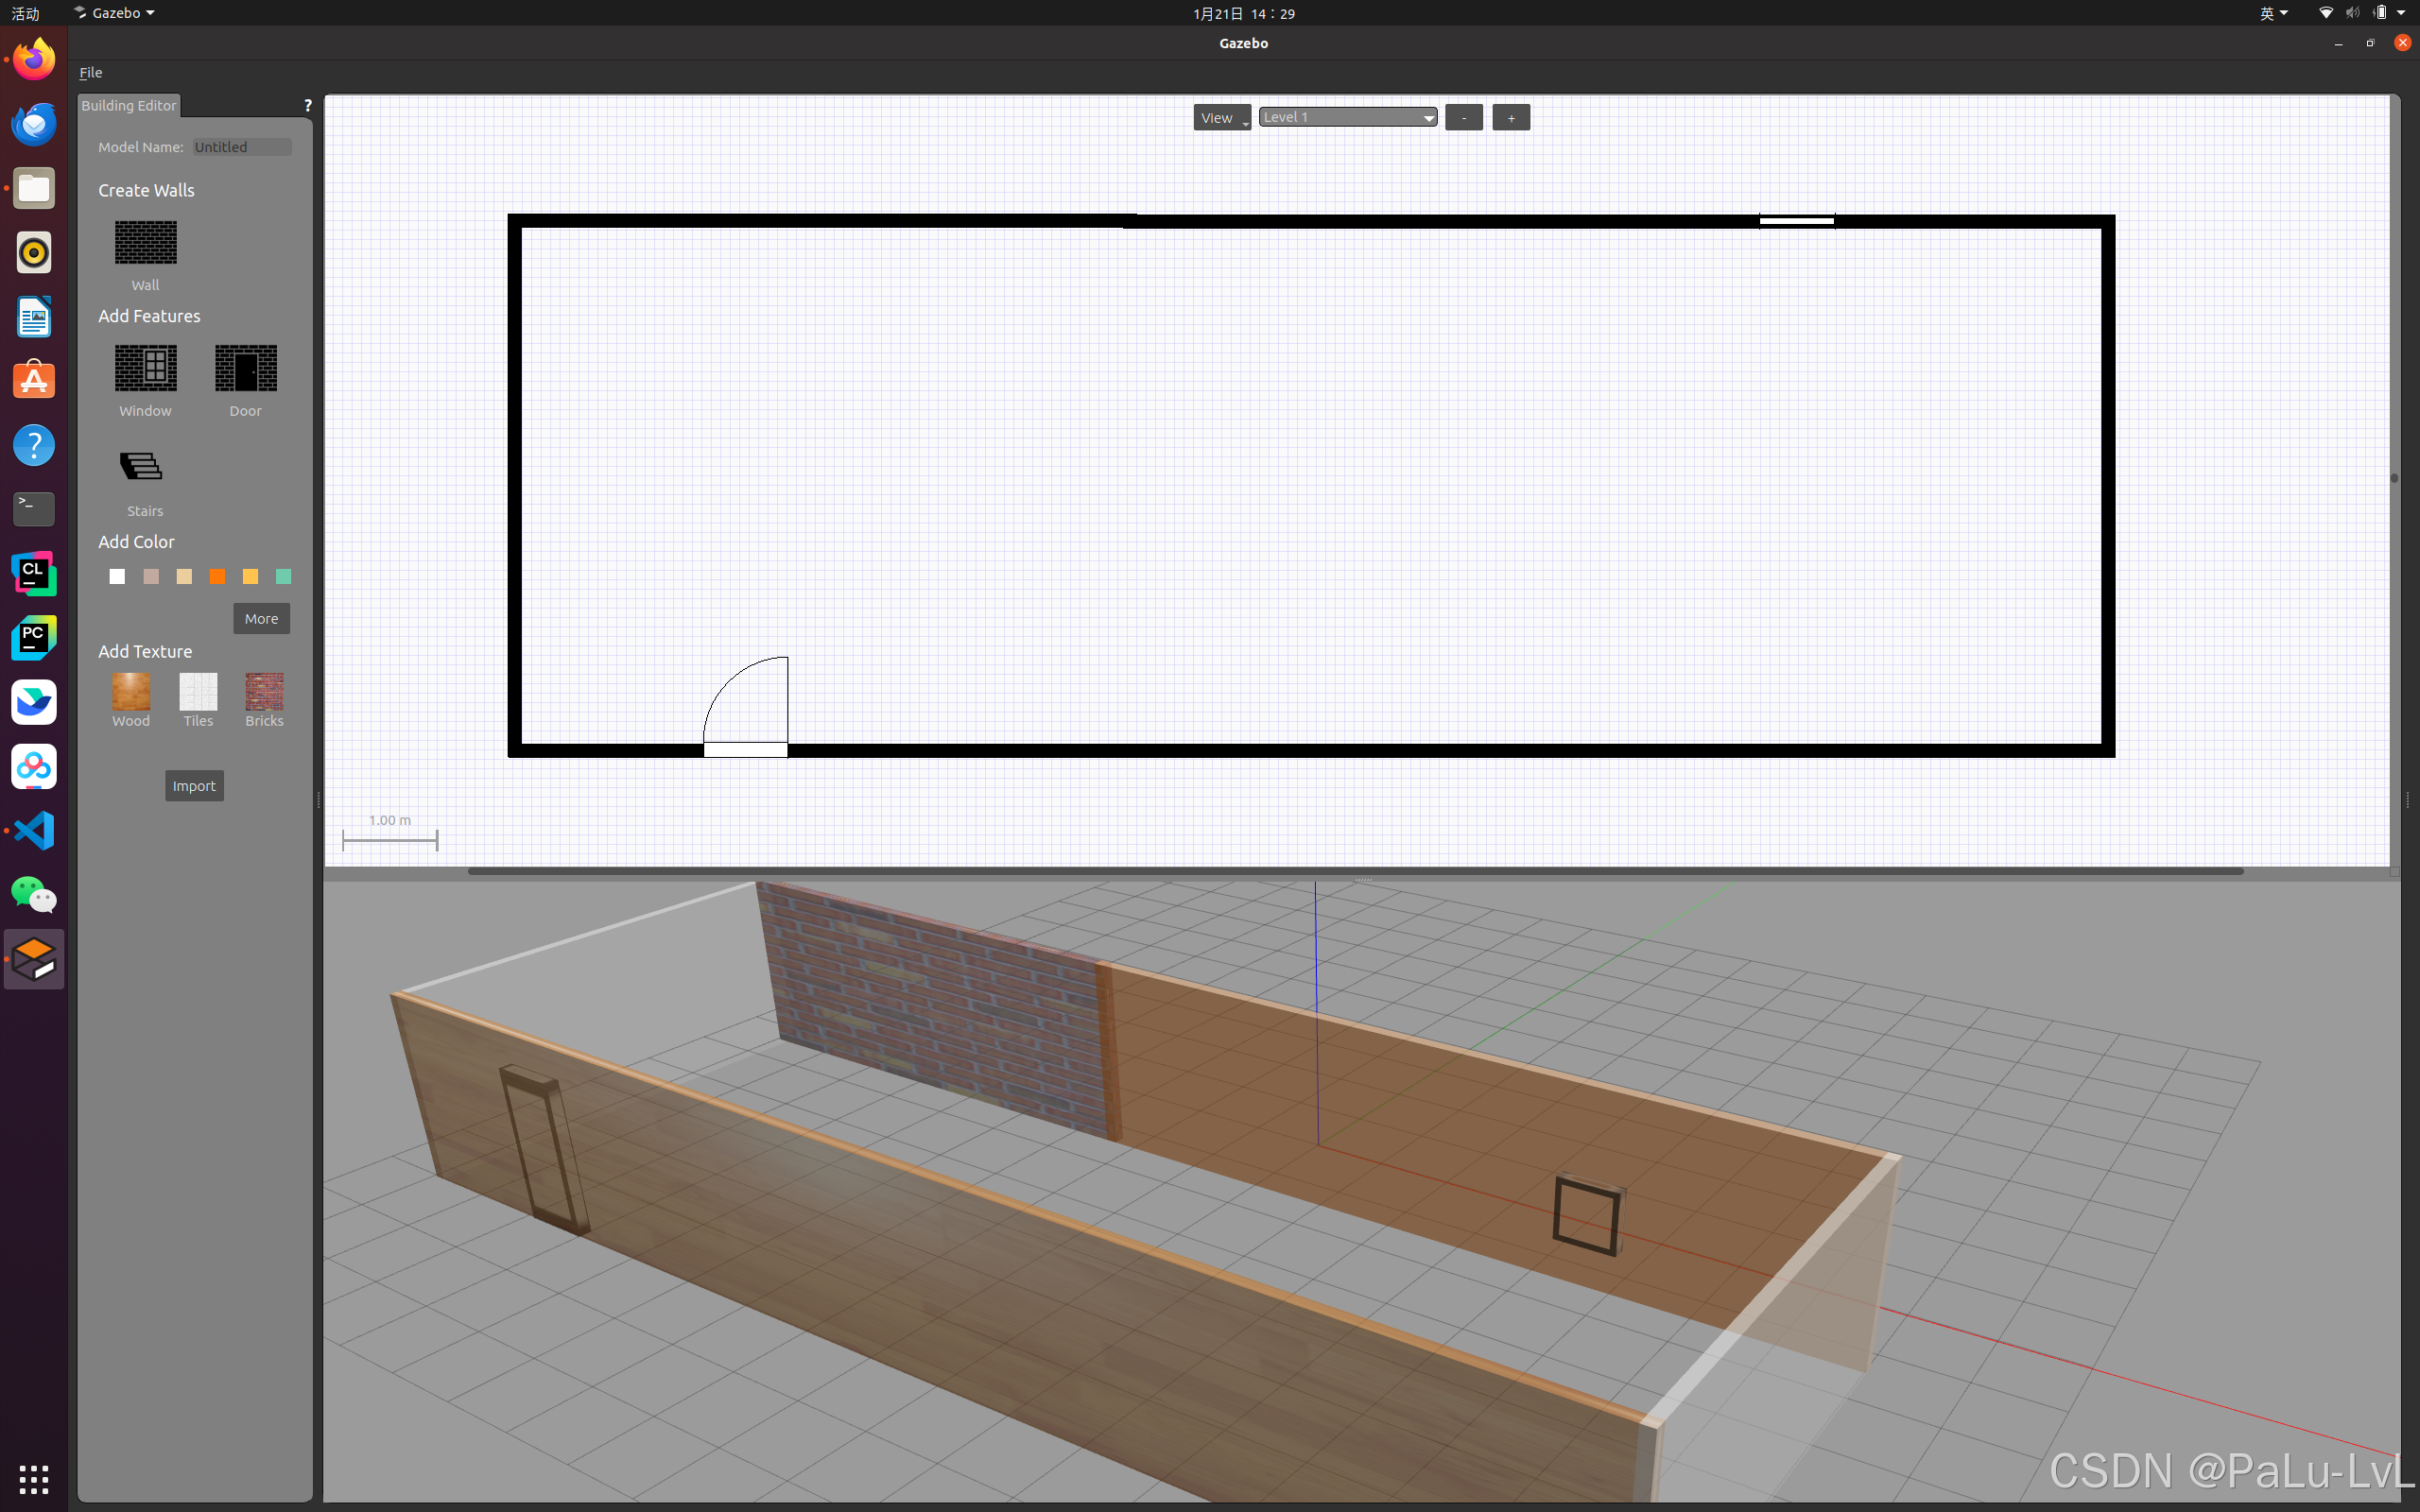
最后保存到一个路径中。
三、URDF、Gazebo与Rviz的综合应用
关于URDF(Xacro)、Rviz 和 Gazebo 三者的关系,前面已有阐述: URDF 用于创建机器人模型、Rviz 可以显示机器人感知到的环境信息,Gazebo 用于仿真,可以模拟外界环境,以及机器人的一些传感器,如何在 Gazebo 中运行这些传感器,并显示这些传感器的数据(机器人的视角)呢?本节主要介绍的重点就是将三者结合:通过 Gazebo 模拟机器人的传感器,然后在 Rviz 中显示这些传感器感知到的数据。主要内容包括:
1.运动控制以及里程计信息显示
2.雷达信息仿真以及显示
3.摄像头信息仿真以及显示
4.kinect 信息仿真以及显示
1.机器人运动控制以及里程计信息显示
gazebo 中已经可以正常显示机器人模型了,那么如何像在 rviz 中一样控制机器人运动呢?在此,需要涉及到ros中的组件: ros_control。
1.ros_control简介
1.场景:同一套 ROS 程序,如何部署在不同的机器人系统上,比如:开发阶段为了提高效率是在仿真平台上测试的,部署时又有不同的实体机器人平台,不同平台的实现是有差异的,如何保证 ROS 程序的可移植性?ROS 内置的解决方式是 ros_control。
2.ros_control:
是一组软件包,它包含了控制器接口,控制器管理器,传输和硬件接口。ros_control 是一套机器人控制的中间件,是一套规范,不同的机器人平台只要按照这套规范实现,那么就可以保证ROS 程序兼容,通过这套规范,实现了一种可插拔的架构设计,大大提高了程序设计的效率与灵活性。gazebo 已经实现了 ros_control 的相关接口,如果需要在 gazebo 中控制机器人运动,直接调用相关接口即可。
2.运动控制实现流程(Gazebo)
1.已经创建完毕的机器人模型,编写一个单独的 xacro文件,为机器人模型添加传动装置以及控制器
2.将此文件集成进xacro文件
3.启动 Gazebo 并发布 /cmd_vel 消息控制机器人运动
3.实现
新建 move.xacro文件,将其集成进 car_camera_lidar01.xacro 文件中
<robot name = "mycar" xmlns:xacro="http://www.ros.org/wiki/xacro"> <xacro:include filename = "inertial.xacro"/> <xacro:include filename = "car.xacro"/> <xacro:include filename = "camera.xacro"/> <xacro:include filename = "lidar.xacro"/> <!--集成运动--> <xacro:include filename = "move.xacro"/> </robot>
写launch文件
car_camera_lidar03.launch
<launch> <!-- 将 Urdf 文件的内容加载到参数服务器 --> <param name="robot_description" command="$(find xacro)/xacro $(find urdf_rviz01)/xacro/car_camera_lidar01.xacro" /> <!-- 启动 gazebo name名称固定 value定位--> <include file="$(find gazebo_ros)/launch/empty_world.launch" > <arg name = "world_name" value = "$(find urdf_rviz01)/worlds/box_house.world" /> </include> <!-- 在 gazebo 中显示机器人模型 --> <node pkg="gazebo_ros" type="spawn_model" name="model" args="-urdf -model mycar -param robot_description" /> </launch>
move.xacro的实现
<robot name="my_car_move" xmlns:xacro="http://wiki.ros.org/xacro"> <!-- 传动实现:用于连接控制器与关节 --> <xacro:macro name="joint_trans" params="joint_name"> <!-- Transmission is important to link the joints and the controller --> <transmission name="${joint_name}_trans"> <type>transmission_interface/SimpleTransmission</type> <joint name="${joint_name}"> <hardwareInterface>hardware_interface/VelocityJointInterface</hardwareInterface> </joint> <actuator name="${joint_name}_motor"> <hardwareInterface>hardware_interface/VelocityJointInterface</hardwareInterface> <mechanicalReduction>1</mechanicalReduction> </actuator> </transmission> </xacro:macro> <!-- 每一个驱动轮都需要配置传动装置 --> <xacro:joint_trans joint_name="left2link" /> <xacro:joint_trans joint_name="right2link" /> <!-- 控制器 --> <gazebo> <plugin name="differential_drive_controller" filename="libgazebo_ros_diff_drive.so"> <rosDebugLevel>Debug</rosDebugLevel> <publishWheelTF>true</publishWheelTF> <robotNamespace>/</robotNamespace> <publishTf>1</publishTf> <publishWheelJointState>true</publishWheelJointState> <alwaysOn>true</alwaysOn> <updateRate>100.0</updateRate> <legacyMode>true</legacyMode> <leftJoint>left2link</leftJoint> <!-- 左轮 --> <rightJoint>right2link</rightJoint> <!-- 右轮 --> <wheelSeparation>${base_radius* 2}</wheelSeparation> <!-- 车轮间距 --> <wheelDiameter>${wheel_radius* 2}</wheelDiameter> <!-- 车轮直径 --> <broadcastTF>1</broadcastTF> <wheelTorque>30</wheelTorque> <wheelAcceleration>1.8</wheelAcceleration> <commandTopic>cmd_vel</commandTopic> <!-- 运动控制话题 --> <odometryFrame>odom</odometryFrame> <odometryTopic>odom</odometryTopic> <!-- 里程计话题 --> <robotBaseFrame>base_footprint</robotBaseFrame> <!-- 根坐标系 --> </plugin> </gazebo> </robot>
运行launch文件
控制小车运动
rosrun teleop_twist_keyboard teleop_twist_keyboard.py
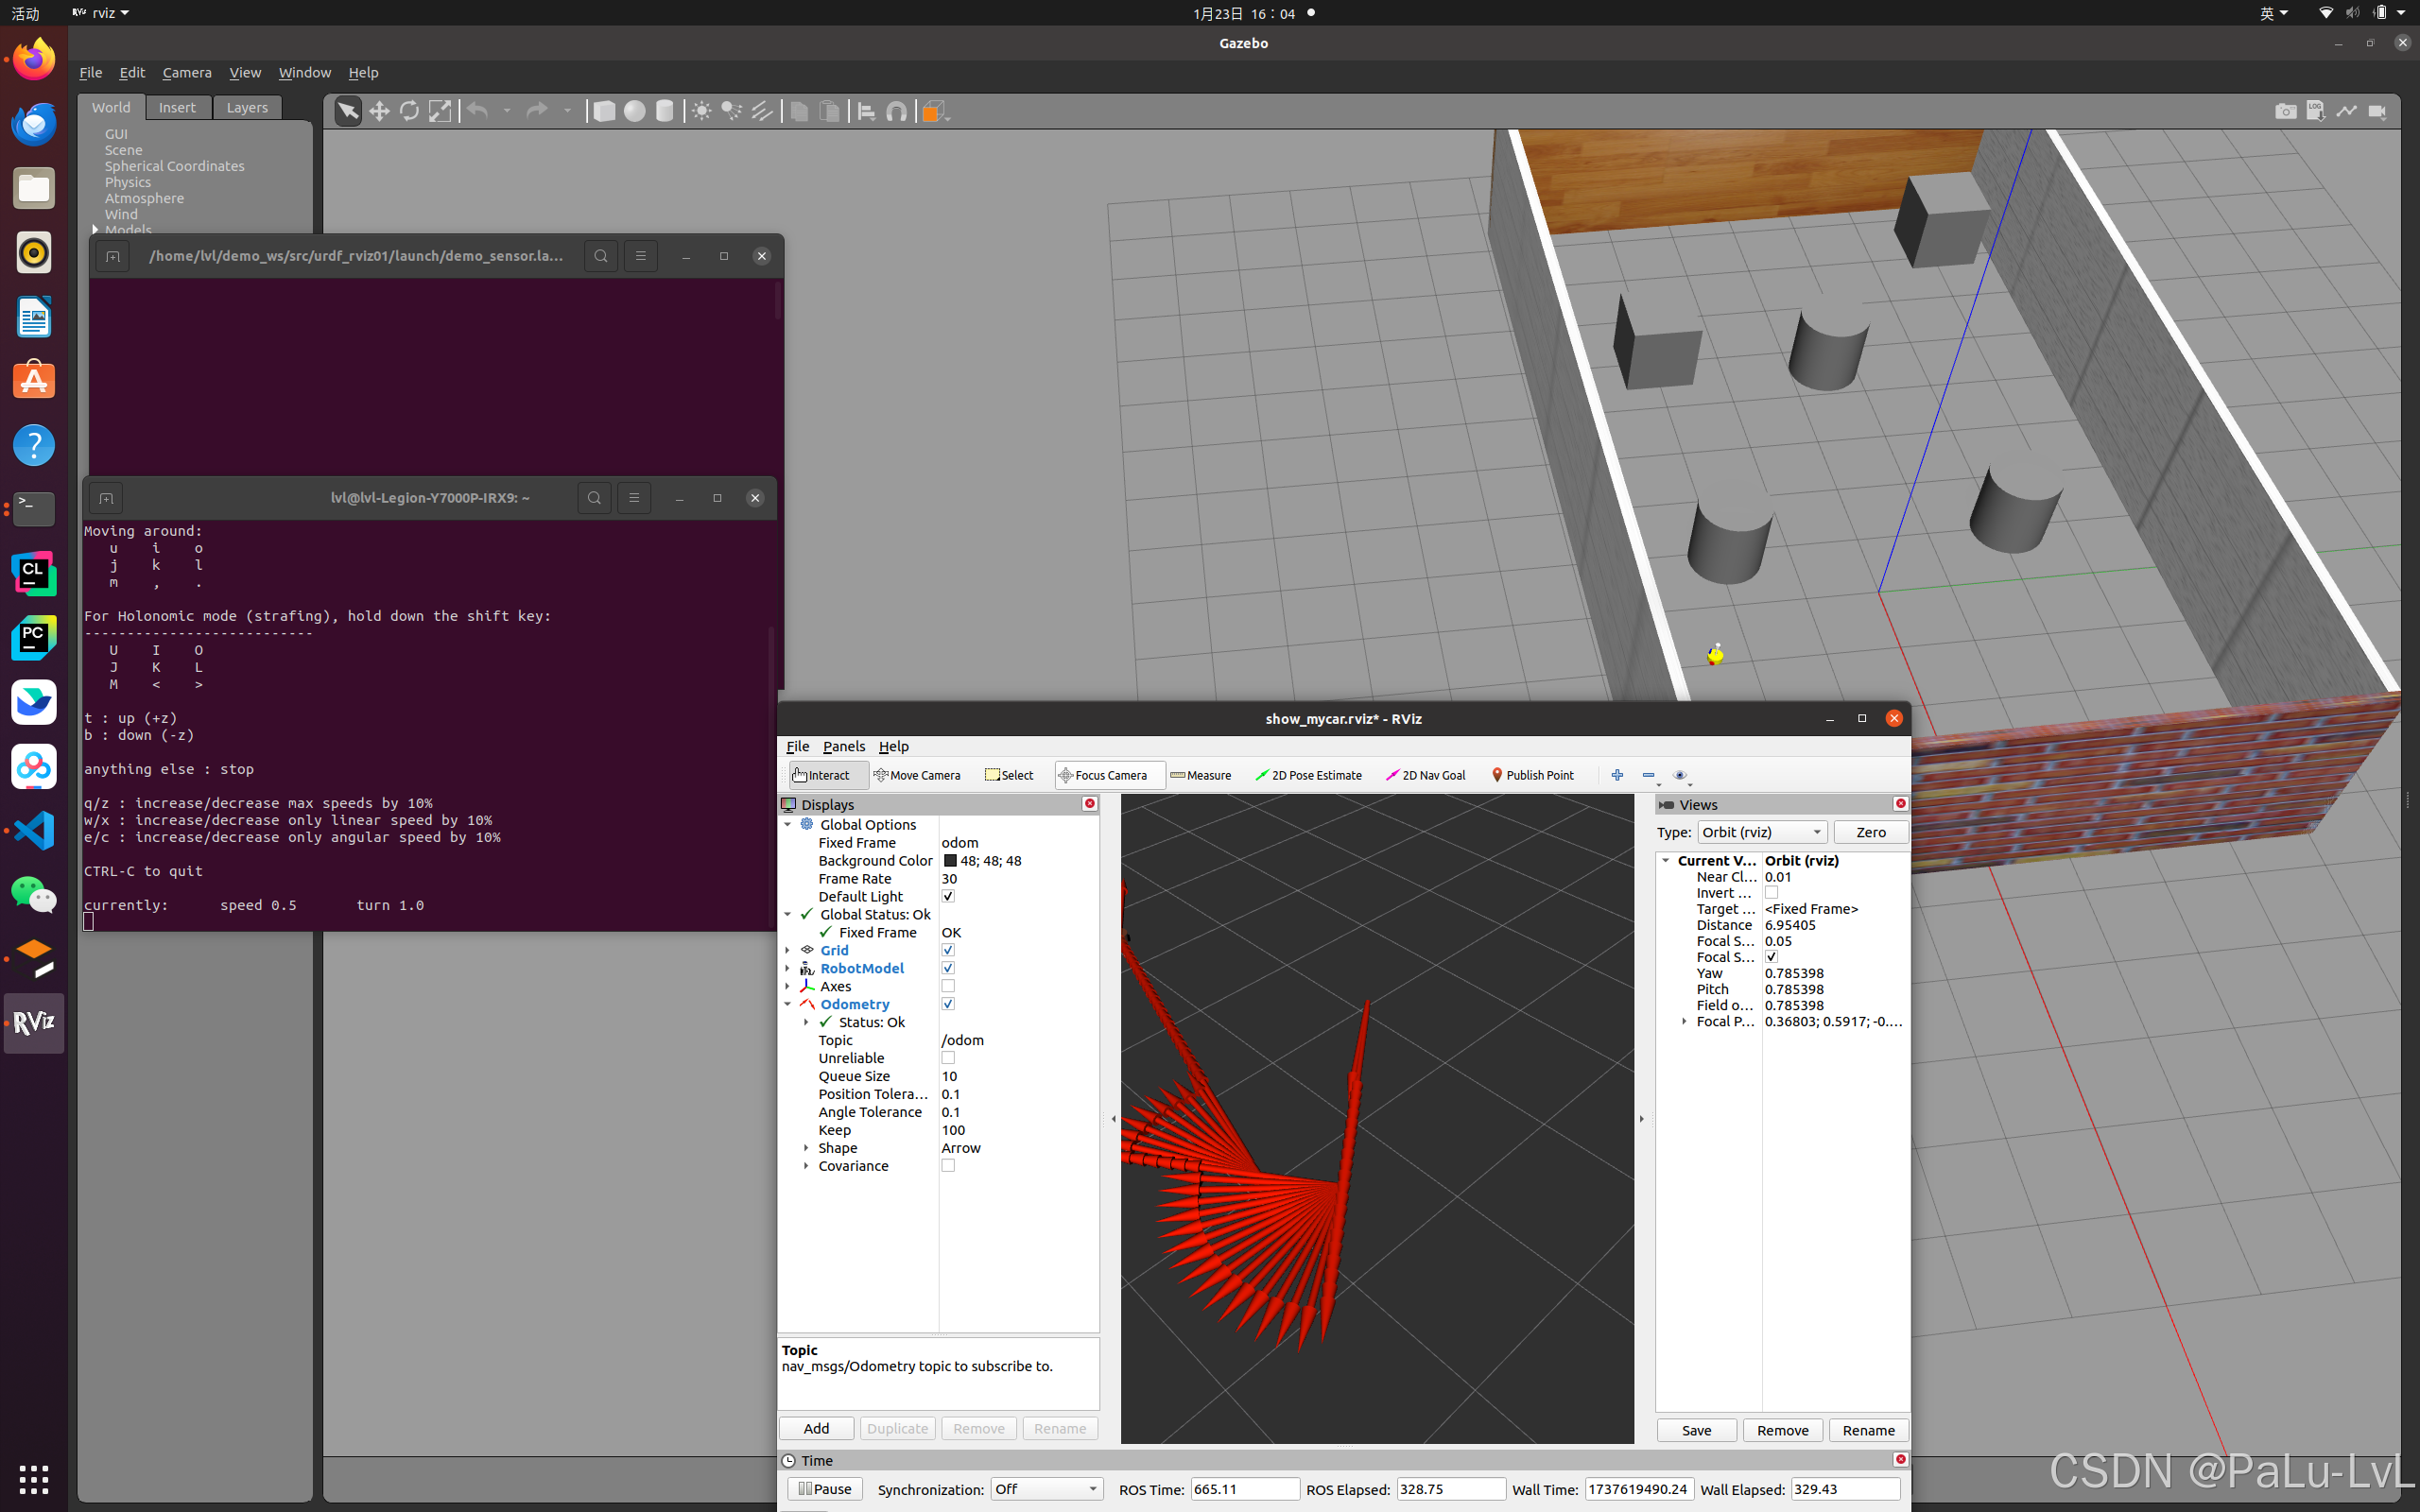
4.rviz查看里程计消息
配置launch文件
<launch> <node pkg="rviz" type="rviz" name="rviz" /> <node pkg="joint_state_publisher" type="joint_state_publisher" name="joint_state_publisher" /> <node pkg="robot_state_publisher" type="robot_state_publisher" name="robot_state_publisher" /> </launch>
先执行仿真环境
roslaunch urdf_rviz01 car_camera_lidar03.launch
再执行刚才配置的launch文件
进行相应设置
运行结果
2.雷达信息仿真以及显示
1.实现流程
摄像头仿真基本流程:
1.已经创建完毕的机器人模型,编写一个单独的 xacro 文件,为机器人模型添加摄像头配置;
2.将此文件集成进xacro文件;
3.启动 Gazebo,使用 Rviz 显示摄像头信息。
2.具体实现
编写一个单独的 xacro 文件,为雷达模型添加摄像头配置(lidar01.xacro)
<robot name="my_sensors" xmlns:xacro="http://wiki.ros.org/xacro"> <!-- 雷达 --> <gazebo reference="laser"> <sensor type="ray" name="rplidar"> <pose>0 0 0 0 0 0</pose> <visualize>true</visualize> <update_rate>5.5</update_rate> <ray> <scan> <horizontal> <samples>360</samples> <resolution>1</resolution> <min_angle>-3</min_angle> <max_angle>3</max_angle> </horizontal> </scan> <range> <min>0.10</min> <max>30.0</max> <resolution>0.01</resolution> </range> <noise> <type>gaussian</type> <mean>0.0</mean> <stddev>0.01</stddev> </noise> </ray> <plugin name="gazebo_rplidar" filename="libgazebo_ros_laser.so"> <topicName>/scan</topicName> <frameName>laser</frameName> </plugin> </sensor> </gazebo> </robot>
将此文件集成进car_camera_lidar01.xacro文件
这里我重新创建了新的文件car_camera_lidar02.xacro
<robot name = "mycar" xmlns:xacro="http://www.ros.org/wiki/xacro"> <xacro:include filename = "inertial.xacro"/> <xacro:include filename = "car.xacro"/> <xacro:include filename = "camera.xacro"/> <xacro:include filename = "lidar.xacro"/> <!--集成运动--> <xacro:include filename = "move.xacro"/> <xacro:include filename = "lidar01.xacro"/> </robot>
首先启动gazebo
启动rviz
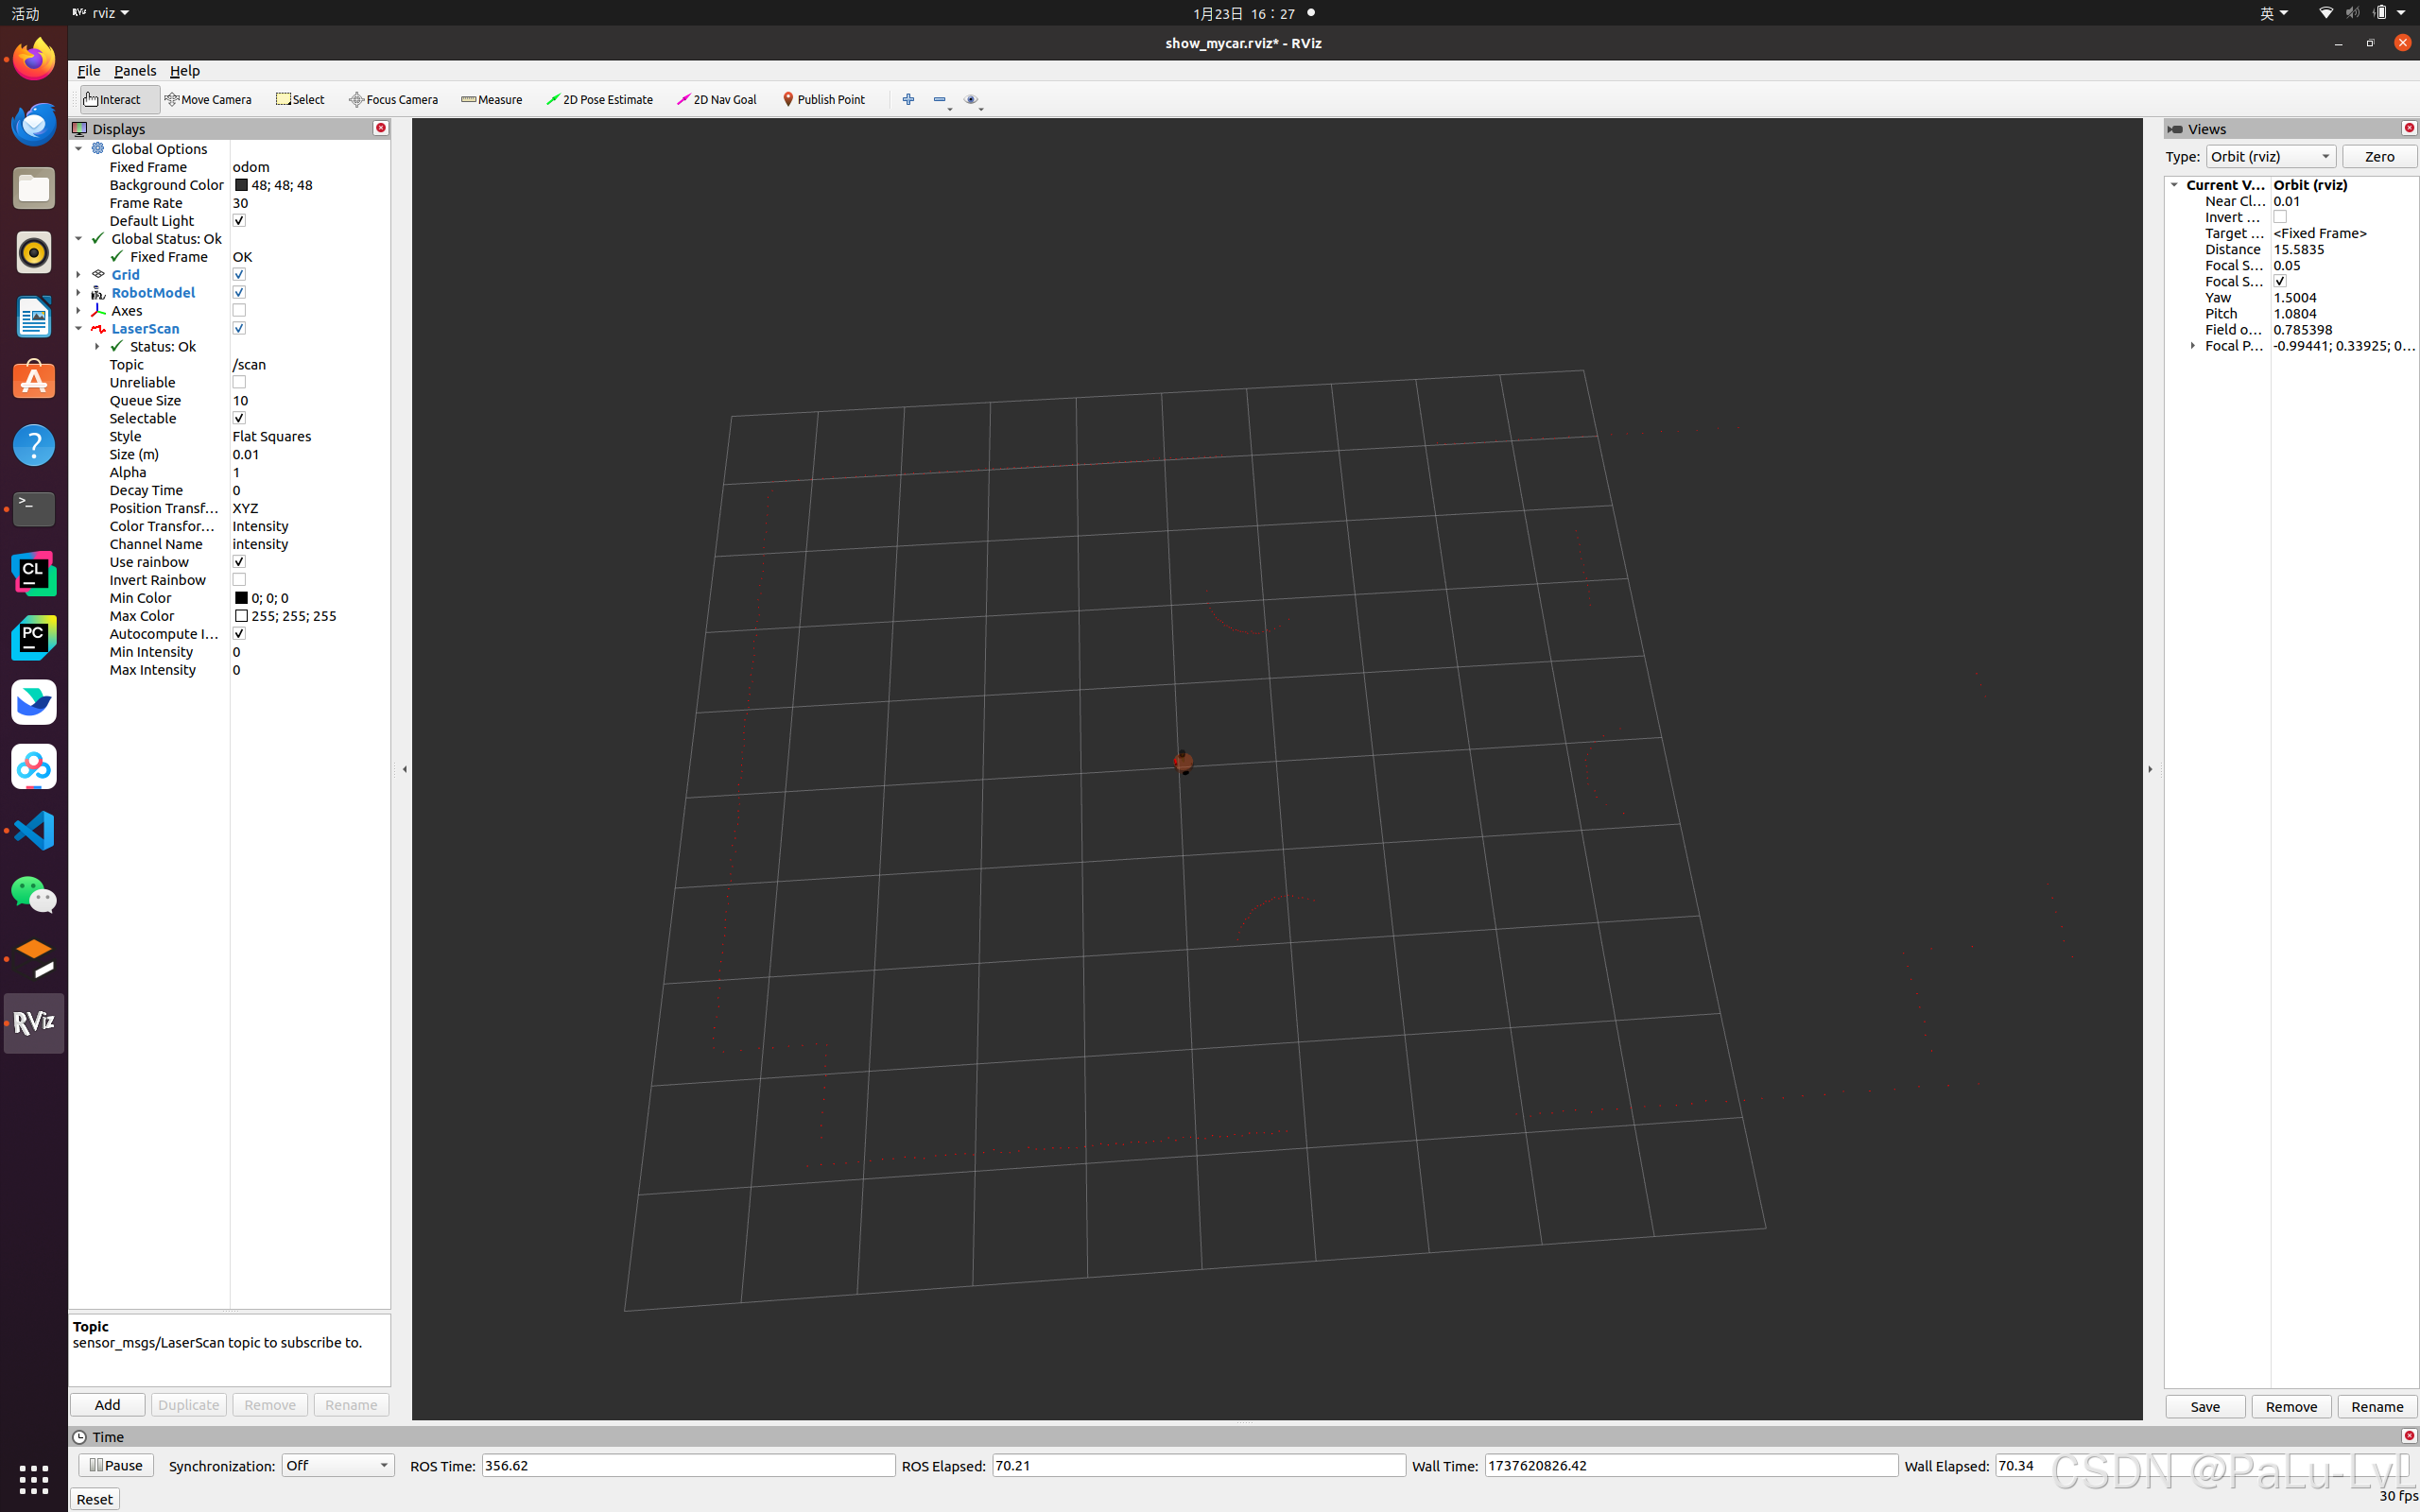
3.摄像头仿真以及显示
1.实现流程
1.已经创建完毕的机器人模型,编写一个单独的 xacro 文件,为机器人模型添加摄像头配置;
2.将此文件集成进xacro文件;
3.启动 Gazebo,使用 Rviz 显示摄像头信息。
2.具体实现
编写一个单独的 xacro 文件,为机器人模型添加摄像头配置 camera01.xacro
<robot name="my_sensors" xmlns:xacro="http://wiki.ros.org/xacro"> <gazebo reference="support"> <sensor type="depth" name="camera"> <always_on>true</always_on> <update_rate>20.0</update_rate> <camera> <horizontal_fov>${60.0*PI/180.0}</horizontal_fov> <image> <format>R8G8B8</format> <width>640</width> <height>480</height> </image> <clip> <near>0.05</near> <far>8.0</far> </clip> </camera> <plugin name="kinect_camera_controller" filename="libgazebo_ros_openni_kinect.so"> <cameraName>camera</cameraName> <alwaysOn>true</alwaysOn> <updateRate>10</updateRate> <imageTopicName>rgb/image_raw</imageTopicName> <depthImageTopicName>depth/image_raw</depthImageTopicName> <pointCloudTopicName>depth/points</pointCloudTopicName> <cameraInfoTopicName>rgb/camera_info</cameraInfoTopicName> <depthImageCameraInfoTopicName>depth/camera_info</depthImageCameraInfoTopicName> <frameName>support</frameName> <baseline>0.1</baseline> <distortion_k1>0.0</distortion_k1> <distortion_k2>0.0</distortion_k2> <distortion_k3>0.0</distortion_k3> <distortion_t1>0.0</distortion_t1> <distortion_t2>0.0</distortion_t2> <pointCloudCutoff>0.4</pointCloudCutoff> </plugin> </sensor> </gazebo> </robot>
将此文件集成进xacro文件
car_camera_lidar03.xacro
<robot name = "mycar" xmlns:xacro="http://www.ros.org/wiki/xacro"> <xacro:include filename = "inertial.xacro"/> <xacro:include filename = "car.xacro"/> <xacro:include filename = "camera.xacro"/> <xacro:include filename = "lidar.xacro"/> <!--集成运动--> <xacro:include filename = "move.xacro"/> <xacro:include filename = "lidar01.xacro"/> <xacro:include filename = "camera01.xacro"/> </robot>
启动 Gazebo,使用 Rviz 显示摄像头信息。
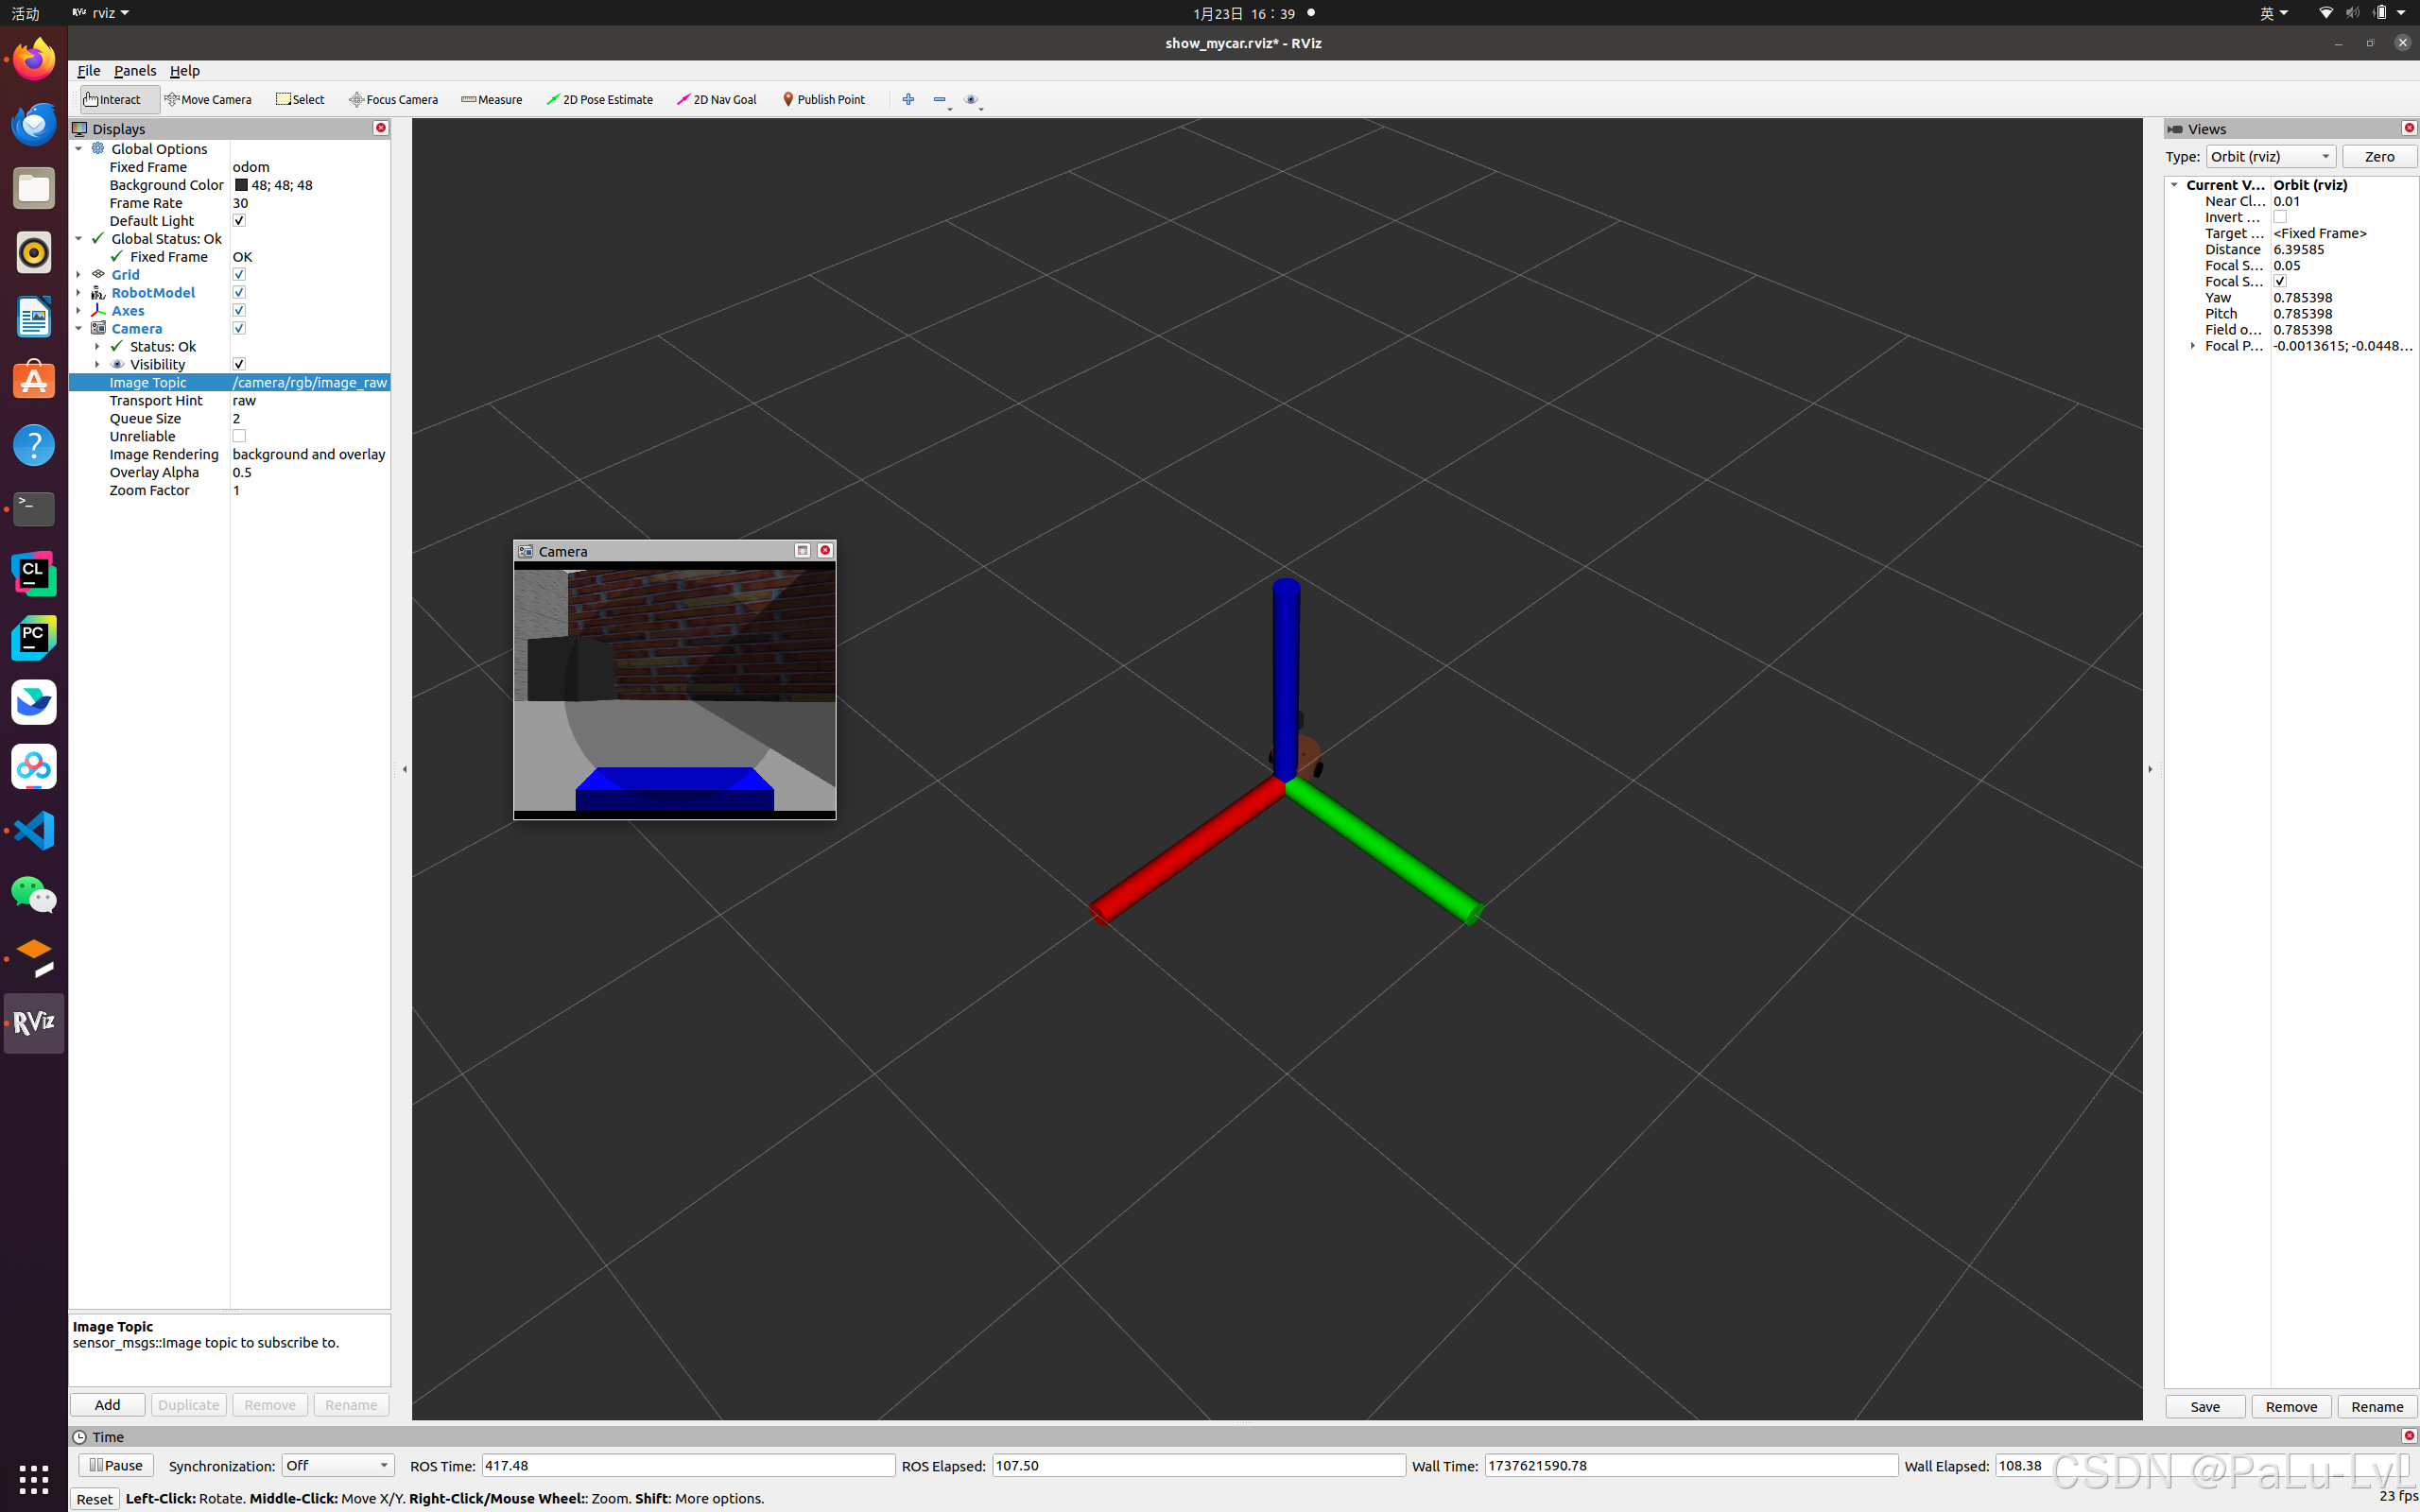
4.kinect深度相机仿真
1.实现流程
1.已经创建完毕的机器人模型,编写一个单独的 xacro 文件,为机器人模型添加kinect摄像头配置;
2.将此文件集成进xacro文件;
3.启动 Gazebo,使用 Rviz 显示kinect摄像头信息。
2.具体实现
编写一个单独的 xacro 文件,为机器人模型添加kinect摄像头配置。
<robot name="my_sensors" xmlns:xacro="http://wiki.ros.org/xacro"> <gazebo reference="support"> <sensor type="depth" name="camera"> <always_on>true</always_on> <update_rate>20.0</update_rate> <camera> <horizontal_fov>${60.0*PI/180.0}</horizontal_fov> <image> <format>R8G8B8</format> <width>640</width> <height>480</height> </image> <clip> <near>0.05</near> <far>8.0</far> </clip> </camera> <plugin name="kinect_camera_controller" filename="libgazebo_ros_openni_kinect.so"> <cameraName>camera</cameraName> <alwaysOn>true</alwaysOn> <updateRate>10</updateRate> <imageTopicName>rgb/image_raw</imageTopicName> <depthImageTopicName>depth/image_raw</depthImageTopicName> <pointCloudTopicName>depth/points</pointCloudTopicName> <cameraInfoTopicName>rgb/camera_info</cameraInfoTopicName> <depthImageCameraInfoTopicName>depth/camera_info</depthImageCameraInfoTopicName> <frameName>support</frameName> <baseline>0.1</baseline> <distortion_k1>0.0</distortion_k1> <distortion_k2>0.0</distortion_k2> <distortion_k3>0.0</distortion_k3> <distortion_t1>0.0</distortion_t1> <distortion_t2>0.0</distortion_t2> <pointCloudCutoff>0.4</pointCloudCutoff> </plugin> </sensor> </gazebo> </robot>
将此文件集成进xacro文件
car_camera_lidar04.xacro
<robot name = "mycar" xmlns:xacro="http://www.ros.org/wiki/xacro"> <xacro:include filename = "inertial.xacro"/> <xacro:include filename = "car.xacro"/> <xacro:include filename = "camera.xacro"/> <xacro:include filename = "lidar.xacro"/> <!--集成运动--> <xacro:include filename = "move.xacro"/> <xacro:include filename = "lidar01.xacro"/> <xacro:include filename = "camera01.xacro"/> <xacro:include filename = "kinect.xacro"/> </robot>
启动 Gazebo,使用 Rviz 显示摄像头信息。
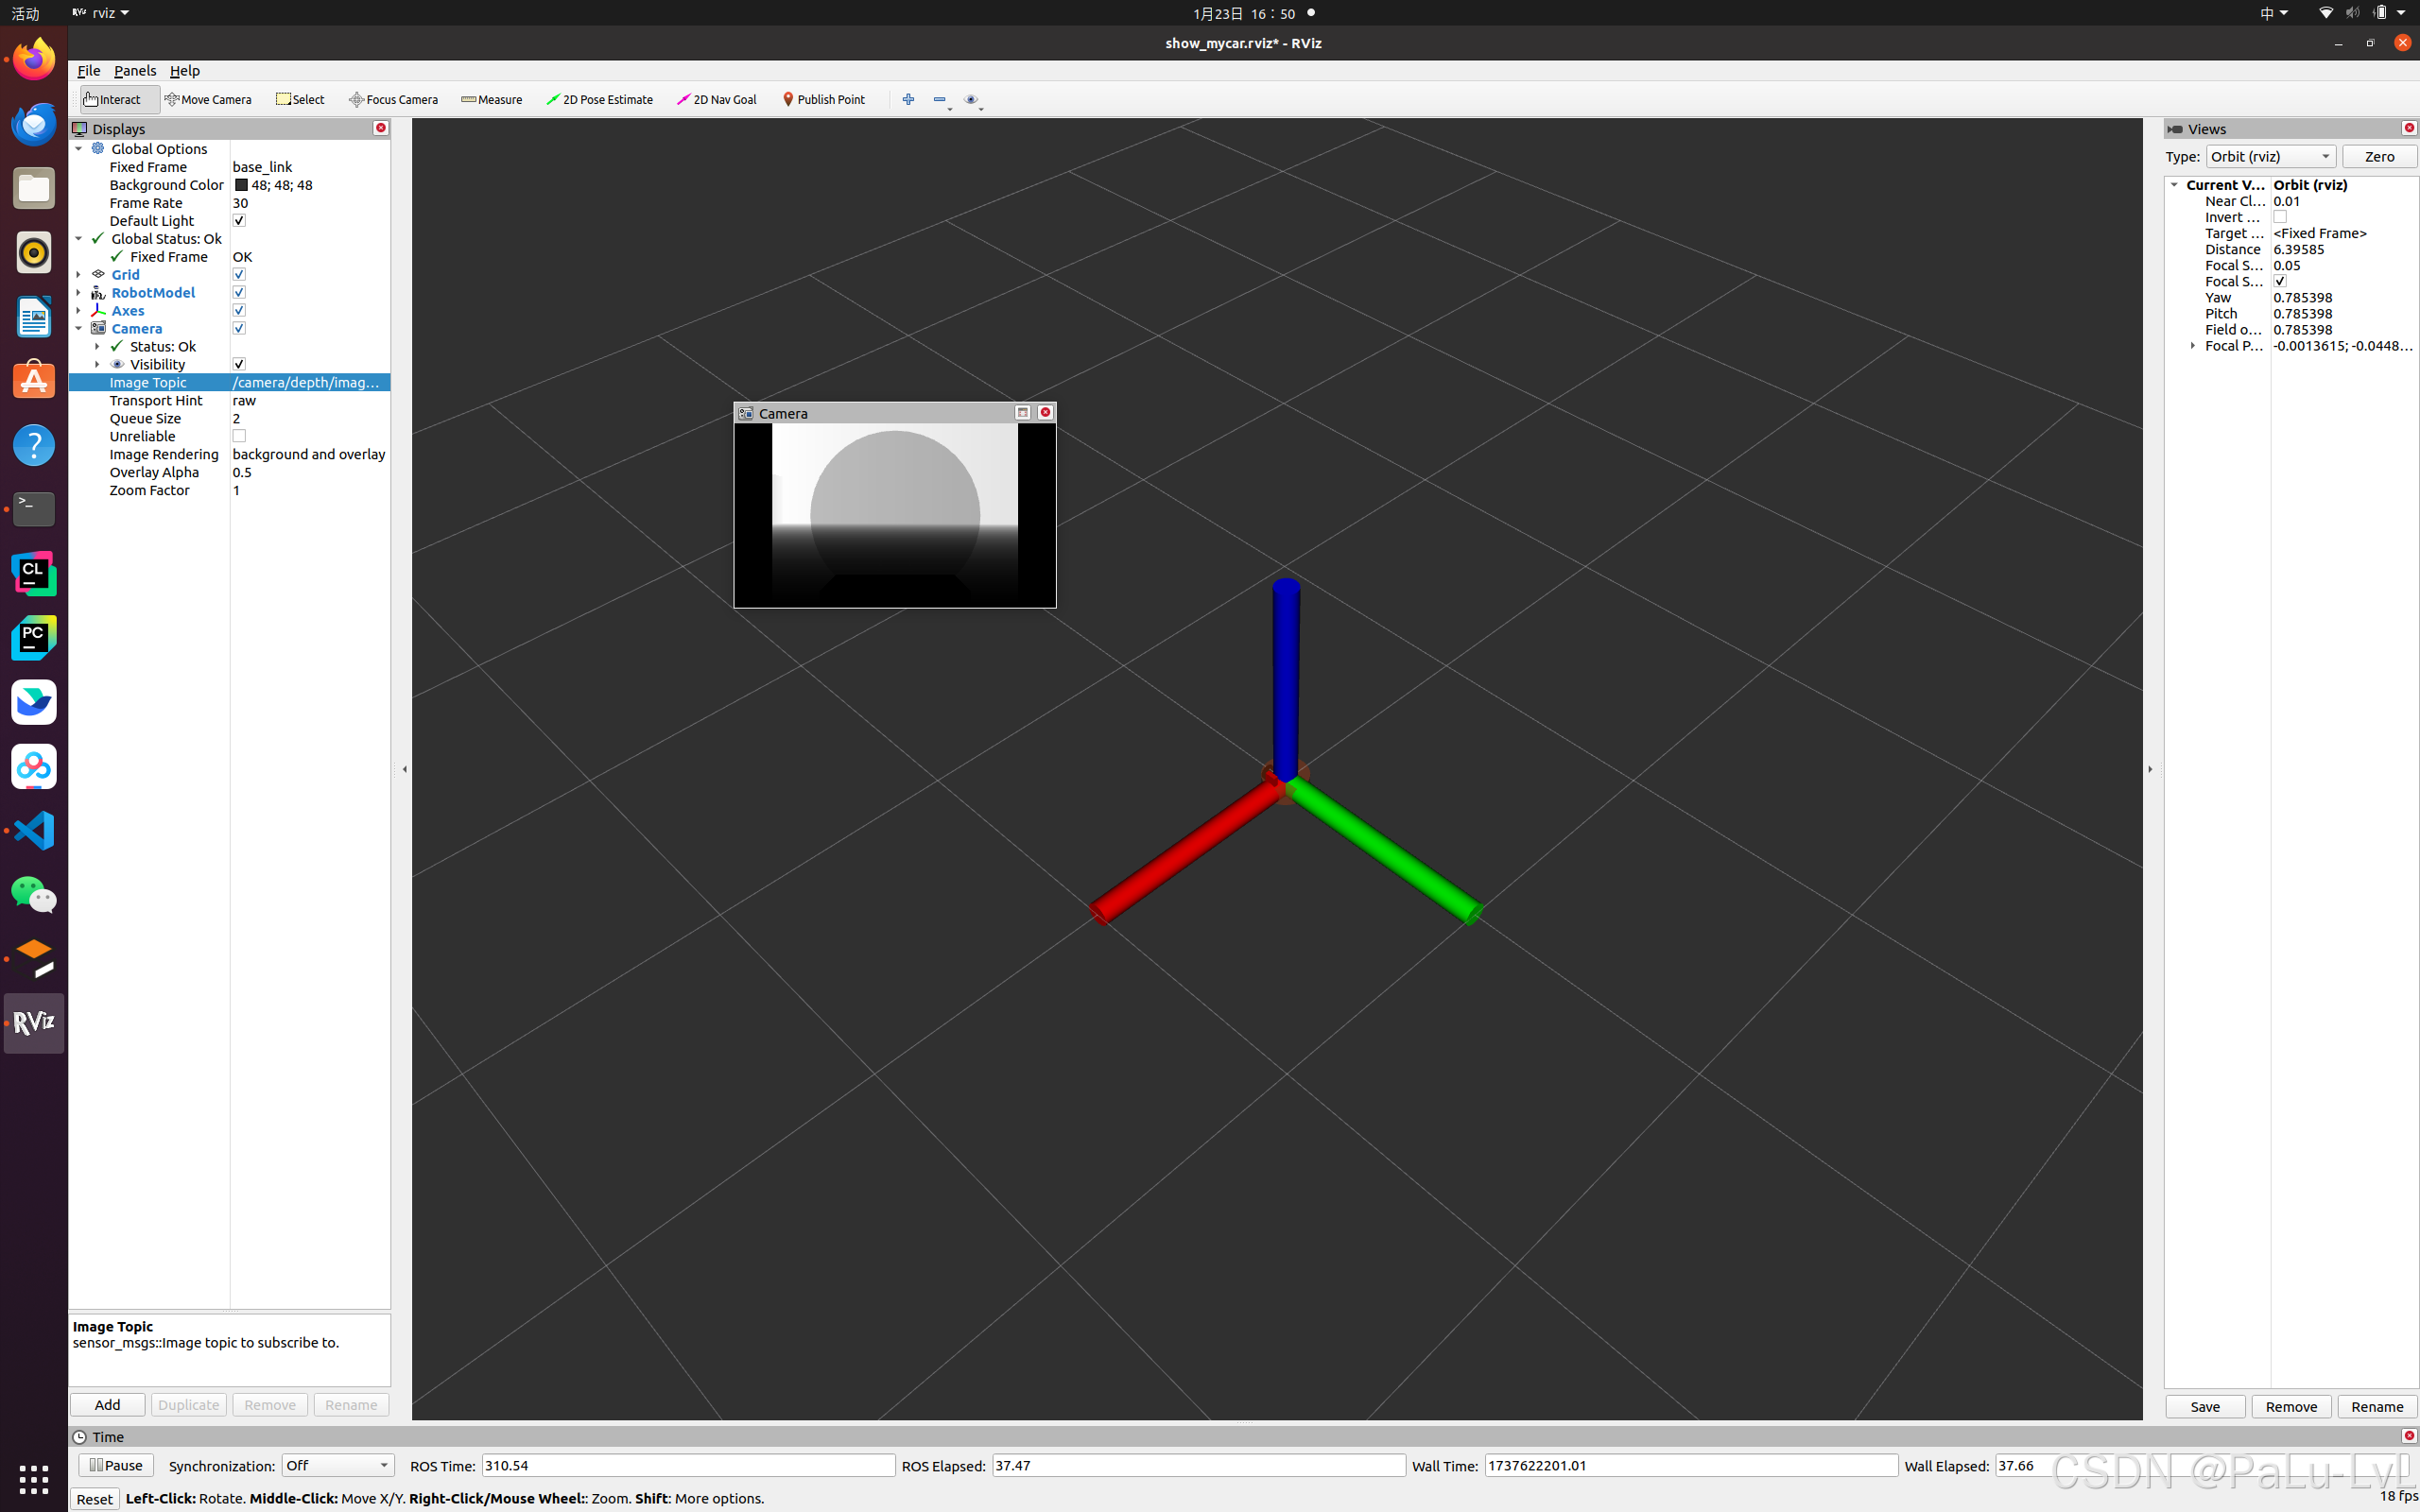
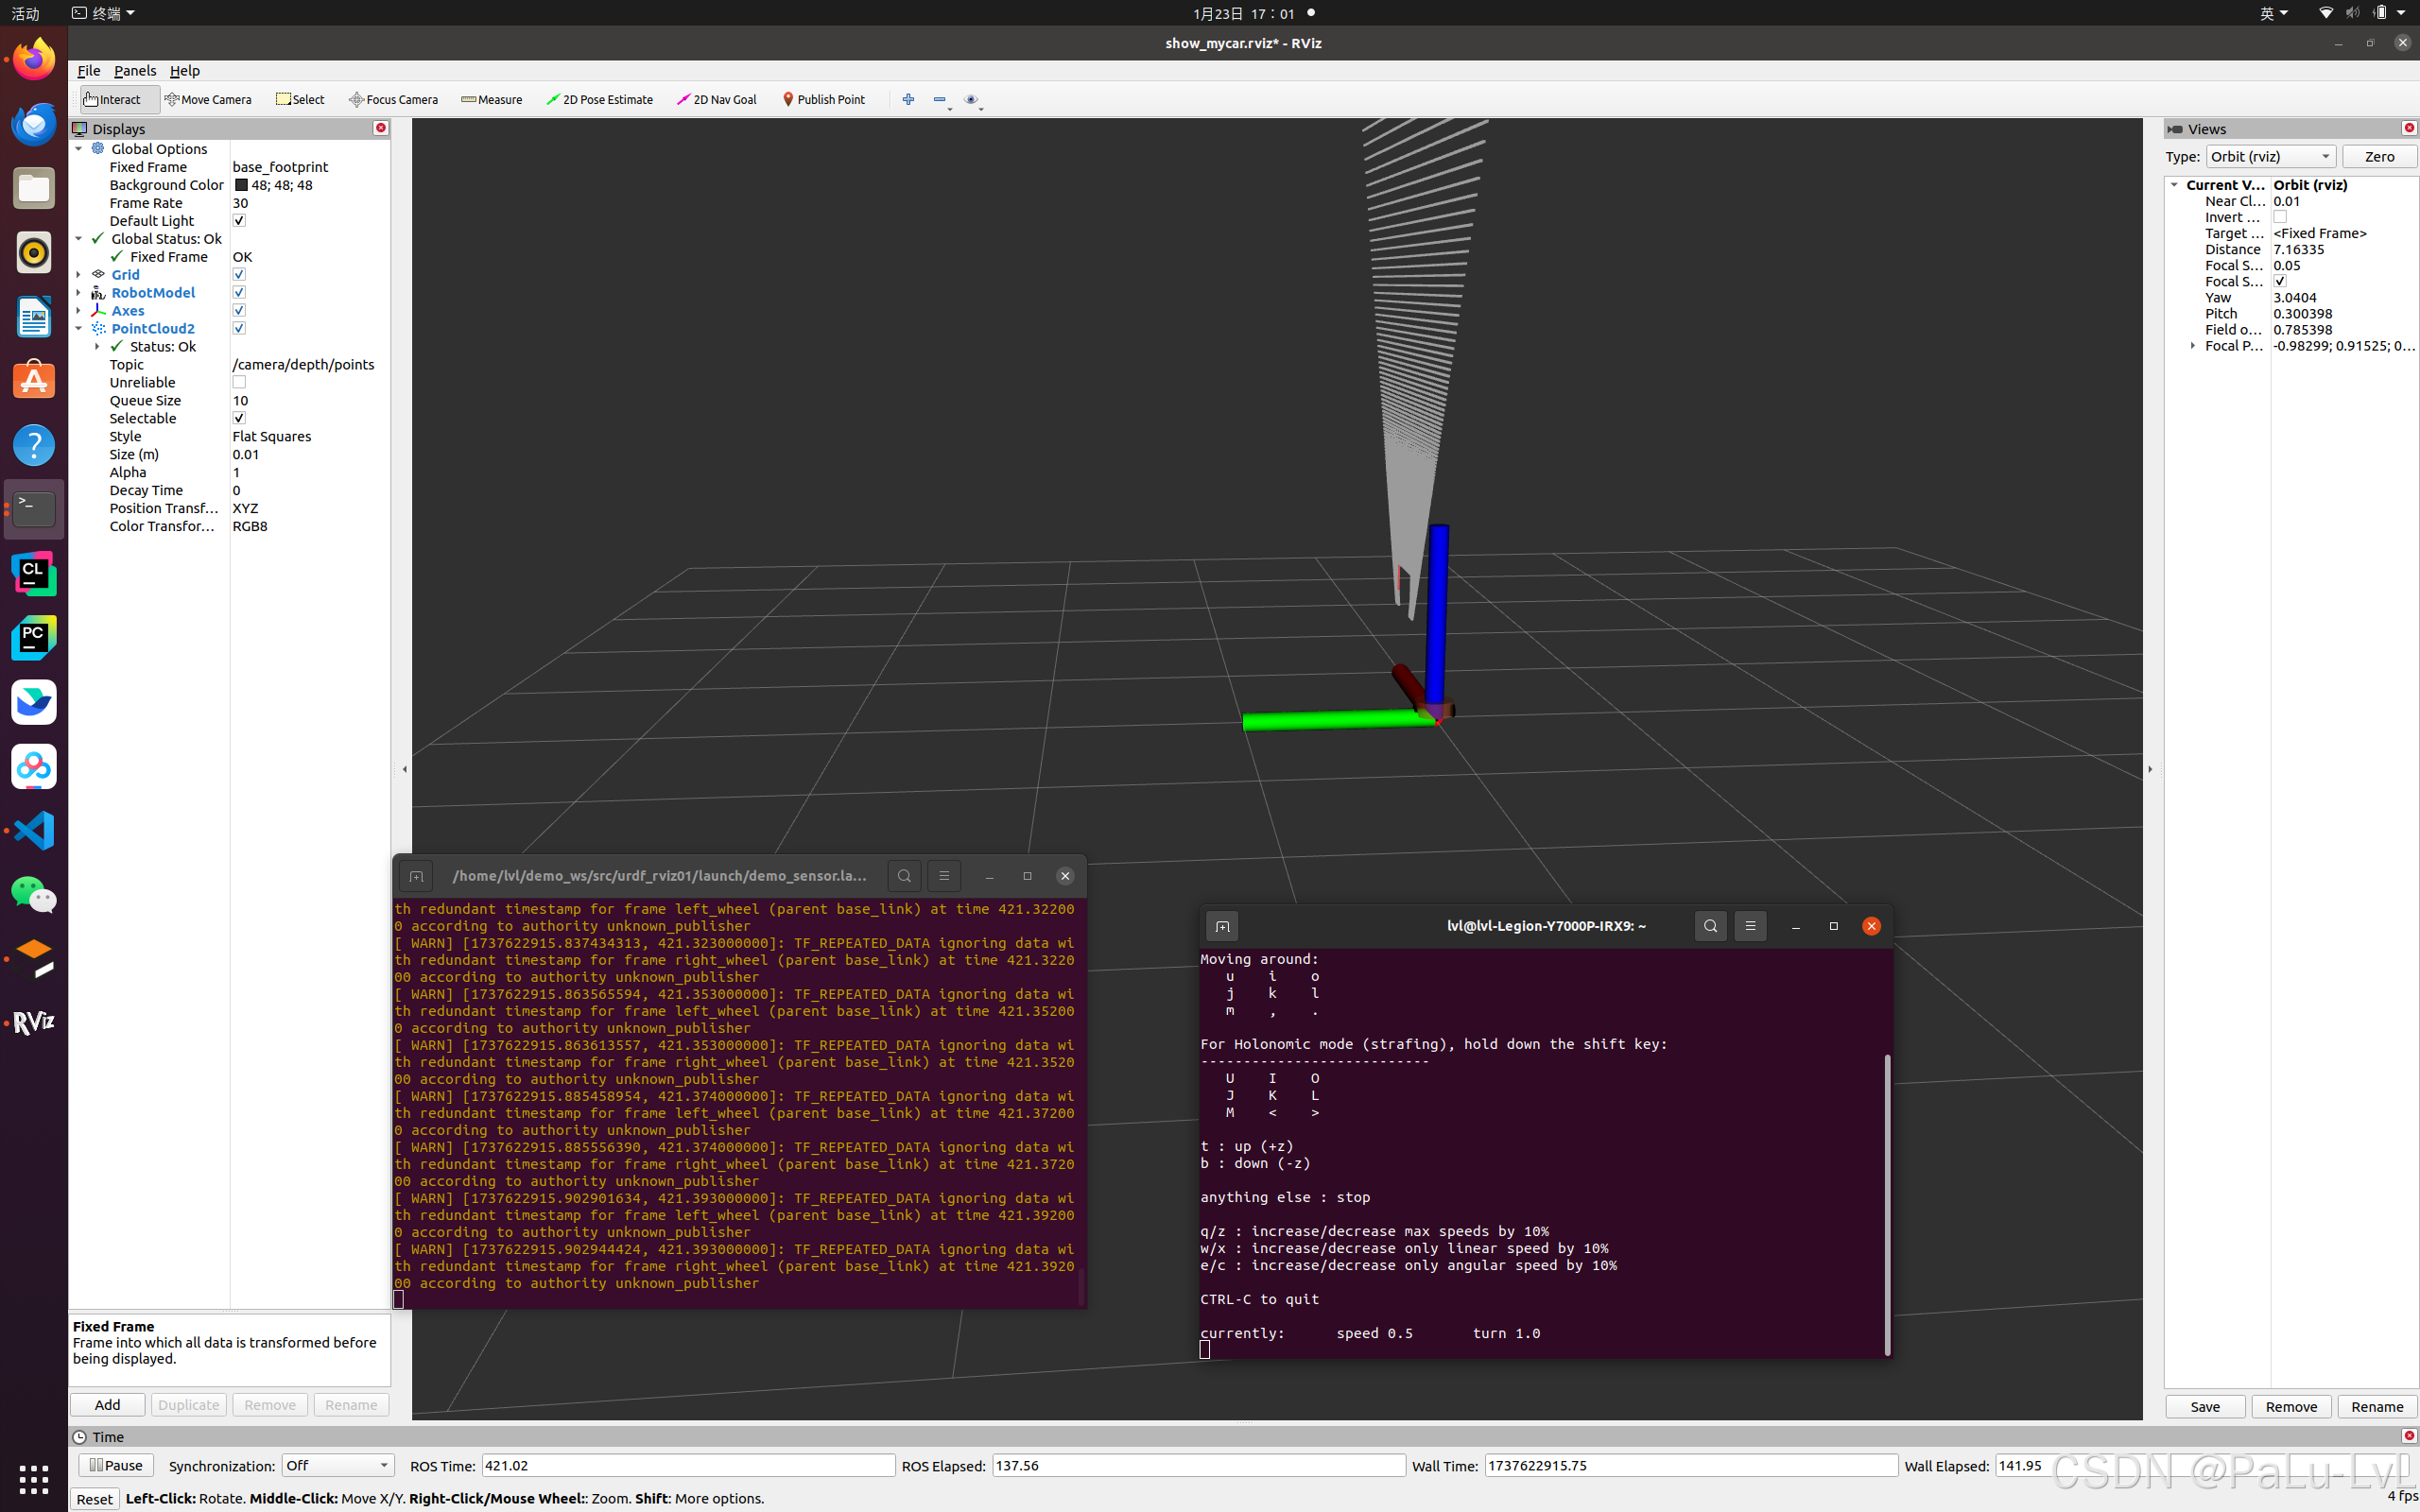
5.kinect点云数据显示
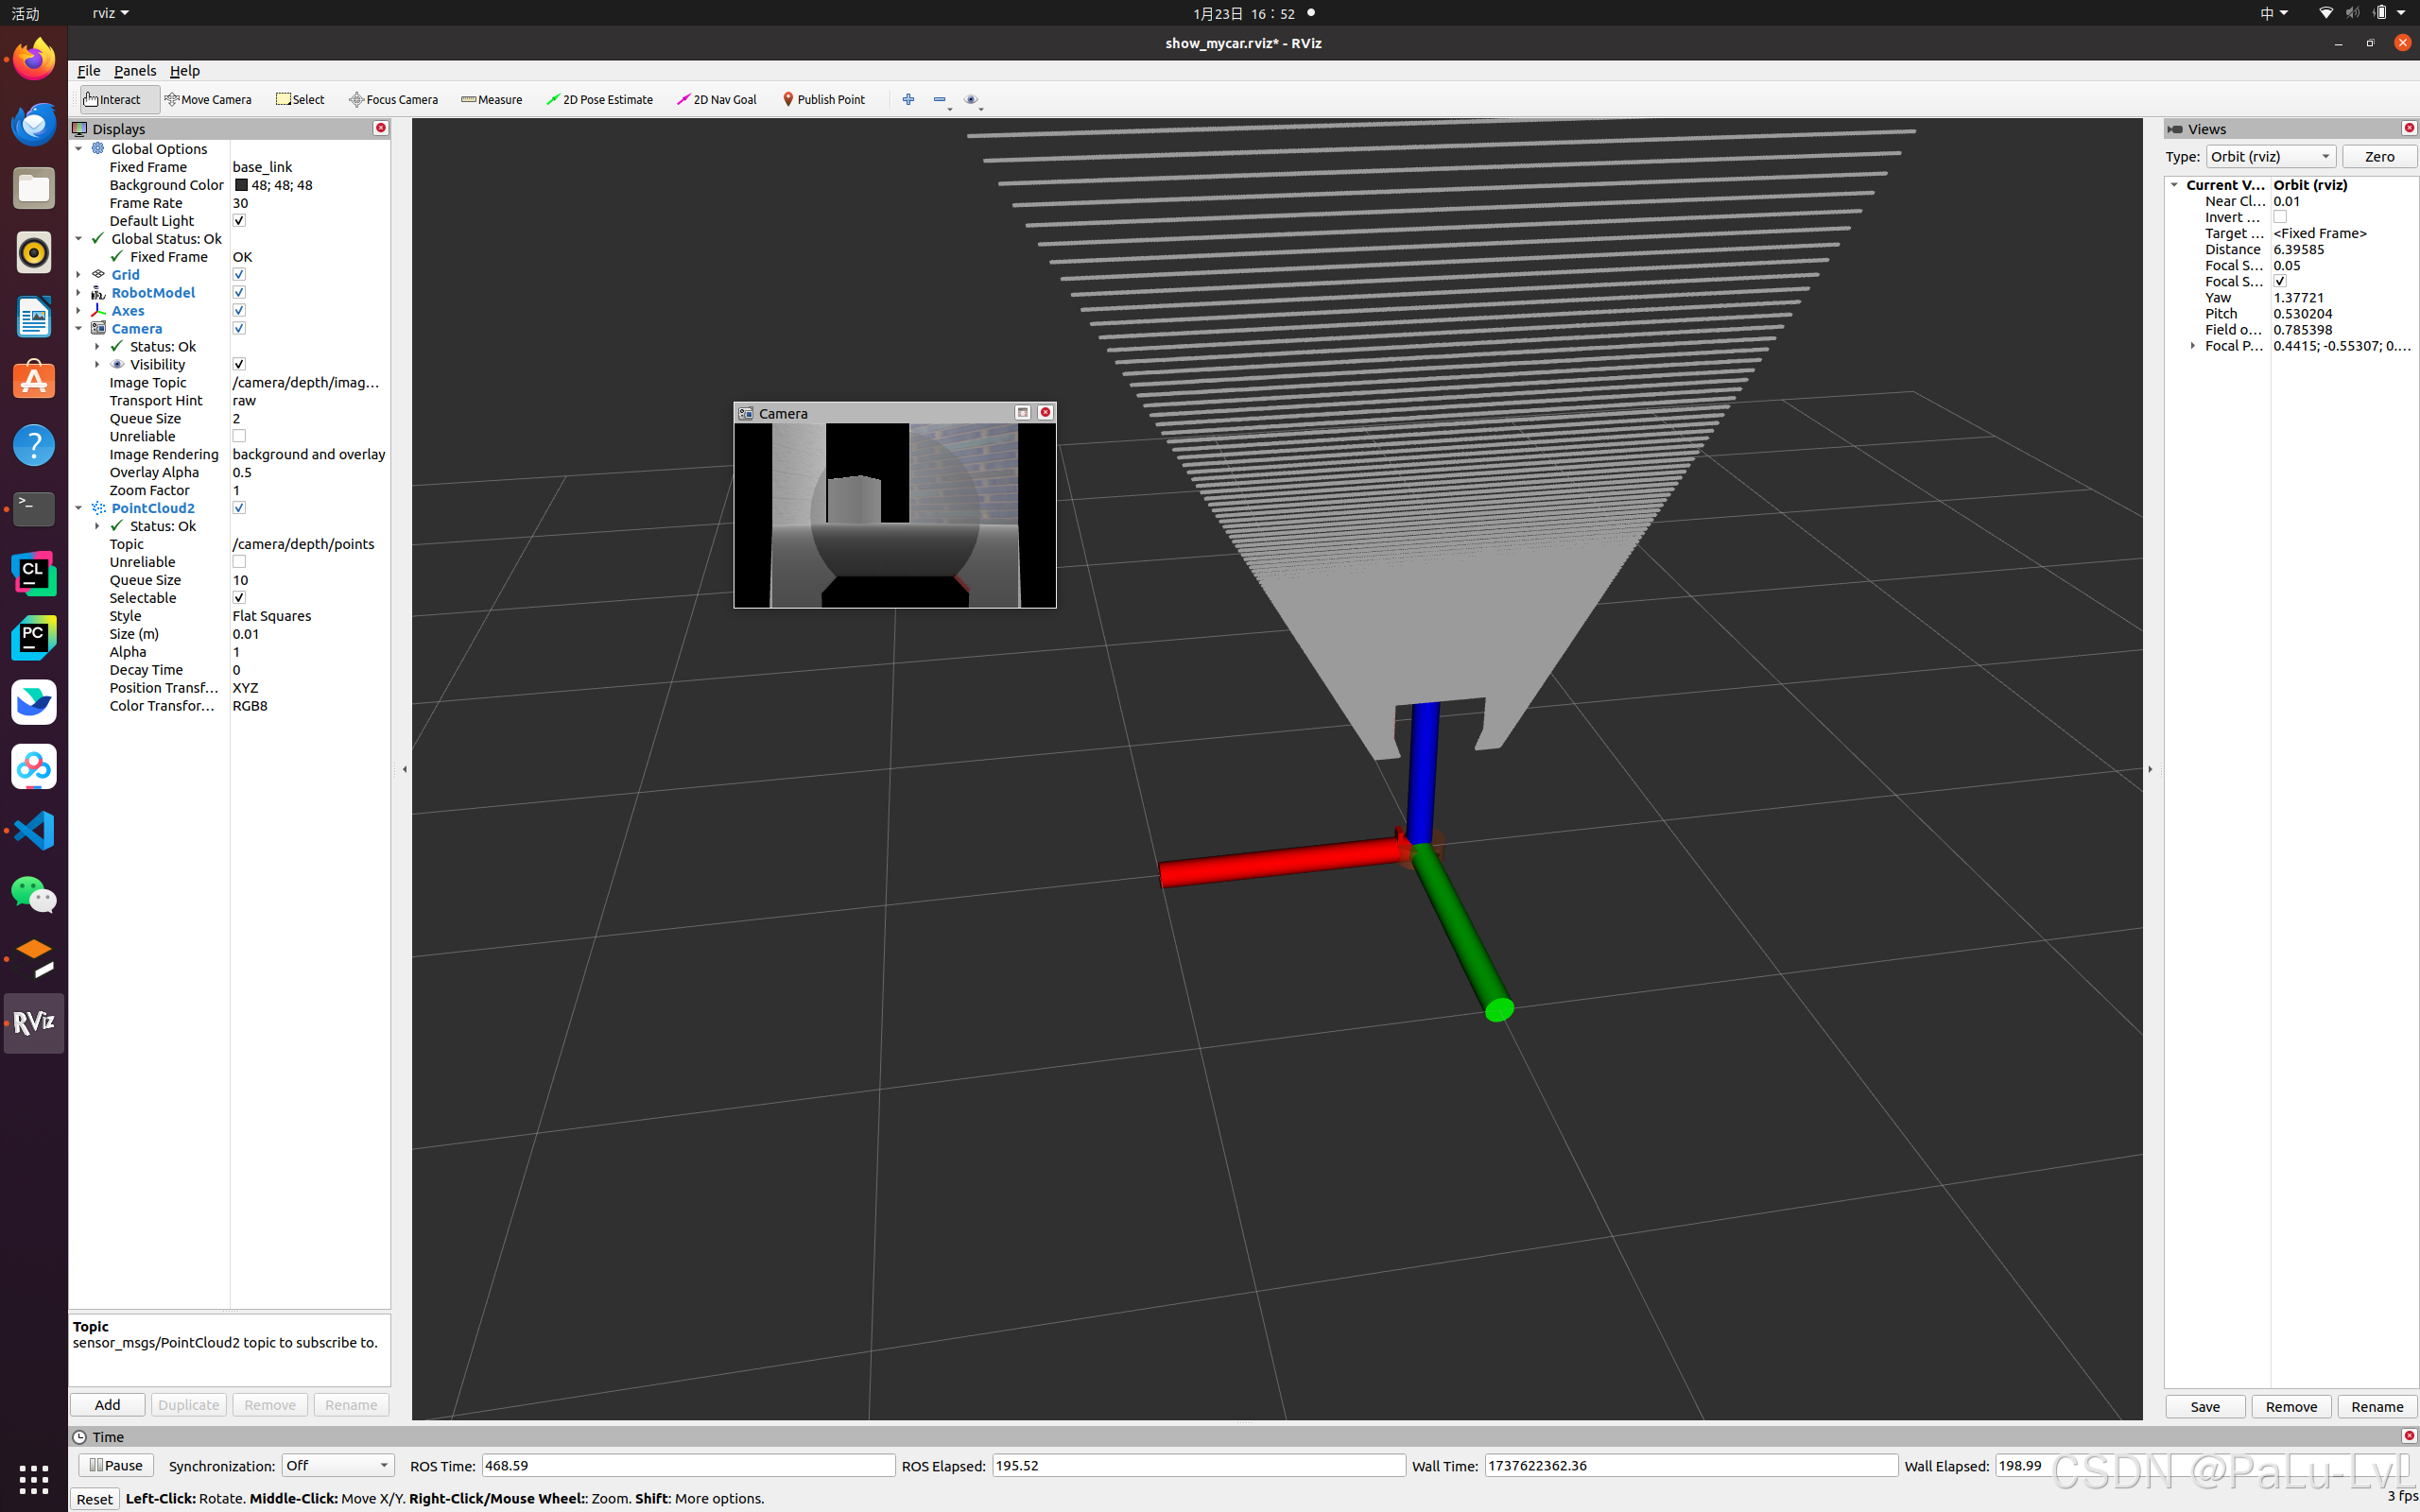
问题:在rviz中显示时错位。
原因:在kinect中图像数据与点云数据使用了两套坐标系统,且两套坐标系统位姿并不一致。
解决:
1.在插件中为kinect设置坐标系,修改配置文件的<frameName>标签内容:
<frameName>support_depth</frameName>
2.发布新设置的坐标系到kinect连杆的坐标变换关系,在启动rviz的launch中,添加:
<node pkg="tf2_ros" type="static_transform_publisher" name="static_transform_publisher" args="0 0 0 -1.57 0 -1.57 /support /support_depth" />
重启rviz查看
小结
本章主要介绍了ROS中仿真实现涉及的三大知识点:URDF(Xacro)、Rviz、Gazebo
URDF 是用于描述机器人模型的 xml 文件,可以使用不同的标签具代表不同含义,URDF 编写机器人模型代码冗余,xacro 可以优化 URDF 实现,代码实现更为精简、高效、易读。容易混淆的是Rviz与Gazebo,在此我们着重比较以下二者的区别:
1.rviz是三维可视化工具,强调把已有的数据可视化显示;
2.gazebo是三维物理仿真平台,强调的是创建一个虚拟的仿真环境。
rviz需要已有数据。
rviz提供了很多插件,这些插件可以显示图像、模型、路径等信息,但是前提都是这些数据已经以话题、参数的形式发布,rviz做的事情就是订阅这些数据,并完成可视化的渲染,让开发者更容易理解数据的意义。
gazebo不是显示工具,强调的是仿真,它不需要数据,而是创造数据。
我们可以在gazebo中免费创建一个机器人世界,不仅可以仿真机器人的运动功能,还可以仿真机器人的传感器数据。而这些数据就可以放到rviz中显示,所以使用gazebo的时候,经常也会和rviz配合使用。当我们手上没有机器人硬件或实验环境难以搭建时,仿真往往是非常有用的利器。
综上,如果你手上已经有机器人硬件平台,并且在上边可以完成需要的功能,用rviz应该就可以满足开发需求。
如果你手上没有机器人硬件,或者想在仿真环境中做一些算法、应用的测试,gazebo+rviz应该是你需要的。
另外,rviz配合其他功能包也可以建立一个简单的仿真环境,比如rviz+ArbotiX。
结束语
以上就是我学习到的内容,如果对您有帮助请多多支持我,如果哪里有问题欢迎大家在评论区积极讨论,我看到会及时回复。
